

Document overview
Workshop Manual PDF for DEUTZ FAHR 6180P Agrotron → WSXU310200LD50001, Series 6 Agrotron (STAGE 3B) family. Document language: English; 1,764 pages.
The corresponding English table of contents contains 47 sections and 456 individual topics.
Main sections included
- Introduction
- Safety
- Technical characteristics
- Calibrations and electronic diagnosis
- Method of intervention
- Wiring diagrams
- Service Info
Document details
- Brand: DEUTZ FAHR
- Family: Series 6 Agrotron (STAGE 3B)
- Model: 6180P Agrotron
- Starting serial number: WSXU310200LD50001
- Document type: Workshop Manual
- Language: English
- Pages: 1,764
- File size: 171.25 MiB
- Format: Digital PDF download
Compatibility
Before purchasing, verify that your machine model and reference code match DEUTZ FAHR 6180P Agrotron → WSXU310200LD50001.
Complete table of contents
Introduction
- Tightening Torques
- Units of measurement and conversion factors
Safety
Preface
- Important notes concerning safety
Important safety information
- Recognising hazards
- Indications for persons in contact with the tractor
Safety rules
- Risks during tractor preparation
- Risks during maintenance
- Work on machine systems
- Special disassembly/assembly/inspection procedures
Safety pictograms
- Replacing safety pictograms
Environmental risks
- Hazards associated with the operating environment
Technical characteristics
Engine
- Motor description – construction type
- Engine description – Images of engine
- Engine description – Lubricant oil diagram
- Engine description – Fuel circuit diagram
- Engine description – Coolant diagram
- Engine description – Exhaust gas recovery
- Engine description – Exhaust gas after-treatment
- Engine description – Electrical/electronic system
- Use – Environmental conditions
- Use – First start-up
- Usage – Starting procedure
- Usage – Controlling engine operation
- Use – exhaust gas after-treatment systems
- Usage – Active regeneration
- Usage – Passive regeneration
- Use – Stop procedure
- Operating materials – lubricant oil
- Operating materials – Fuel
- Operating materials – Coolant
- Fluids – SCR reduction agent
- Maintenance – Maintenance schedule
- Care and maintenance work – Lubricant oil system
- Care and maintenance work – Fuel distribution system
- Care and maintenance – SCR
- Care and maintenance work – Cooling system
- Care and maintenance work – Engine cleaning
- Care and maintenance work – Intake system
- Care and maintenance work – Belt transmissions
- Care and maintenance – Adjustments and settings
- Care and maintenance work – Electrical system
- Malfunctions – Malfunction table
- Faults – Engine management
- Transport and storage – Transport
- Transport and storage – Transport and storage
- Technical data – Engine data and adjustment data
- Technical data – Tools
Engine accessories
- SCR system
- AdBlue® technical characteristics
- AdBlue Quality
- Pressure transducer (L3)
- Pressure sensor (L3)
- Temperature sender (L3)
- Temperature sender (L3)
- Temperature sender (L3)
- Temperature sender (L3)
- Speed indicator (L3)
- NOx sensor (L3)
- NOx sensor (L3)
- Removing and fitting fuel lines (fuel delivery pump – fuel control block) (L3)
- Fitting and removing the temperature sender (exhaust gas) (L3)
- Temperature sender (L3)
- Removing and fitting NOx sensor (L3)
- Temperature sender (exhaust gas) (L3)
Transmission
- Transmission
- Rear PTO
Front axle
- Front axle
- Front axle
- Front axle suspension
Bodywork – Cab – Platform
- General introduction to the A/C system
- Changes of the state of matter
- Air conditioning system
- Compressor
- Condenser
- Filter-dryer
- Expansion valve
- Air conditioning system – Diagnostics
Hydraulic system
- Hydraulic System
- Hydraulic pressure measurement points
- 45 cc variable displacement pump
- Priority valve
- Power steering valve
- Hydraulic front axle suspension
- Servo-brake valve for front axle
- Braking system
- Master cylinder
- Rear lift distributor
- Ancillary utility distributor – 10-way version
- Ancillary utility distributor – Version for front lift
- Hydraulic trailer braking system – Italy version
- Hydraulic trailer braking system – Export version
Calibrations and electronic diagnosis
Diagnostic tools
Serdia 2010
- Safety-Hints
- Common Hints
- Common Hints – Start and Communication
- Common Hints – Disposability
- Introduction
- Error Hints (FAQ)
- Connection establishment
- Software handling
- Software handling – Topper elements
- Global Programfunctionality – Dataset management
- Global Programfunctionality – Error memory
- Global Programfunctionality – Graphical display
- Global Programfunctionality – Program adjustments
- UseCases EMR4
- Engine settings
- Adjustments engine speed – acceleration pedal
- CRT – TIER4 interim
- DPF – Burner – TIER4 interim
- SCR – TIER4 interim
- SCR service routines
- DPF service routines
- Service Routines DPF (DOC/SCR)
- Service-Cases
- Other
- UseCases EMR3
- UseCases EMR2
- Programm options
Diagnostic tool screens
- ECU interrogation
Commissioning and calibrating the tractor
- Replacing the HLHP ECU – Initialization of the HLHP control unit
- Replacing the HLHP ECU – Configuration of the tractor model
- Replacing the HLHP ECU – Configuring transmission type
- Replacing the HLHP ECU – Configuring tyre type
- Replacing the HLHP ECU – Configuring wheel circumference
- Replacing the HLHP ECU – Configuring maximum vehicle speed
- Replacing the HLHP ECU – Calibrating the clutch pedal
- Replacing the HLHP ECU – Calibrating the central clutch
- Replacing the HLHP ECU – Calibrating proportional PTO
- Replacing the HLHP ECU – Calibrating Powershift
- Replacing the HLHP ECU – Configuring Front PTO
- Replacing the HLHP ECU – Configuring ASM
- Replacing the HLHP ECU – Configuring the steering angle sensor
- Replacing the HLHP ECU – General lift settings
- Replacing the HLHP ECU – Calibrating low and high positions of the lift
- Replacing the HLHP ECU – Calibrating lift potentiometer
- Replacing the HLHP ECU – Front axle suspension system enable
- Replacing the HLHP ECU – Instrument cluster settings
- Replacing the HLHP ECU – Configuration for presence of the automatic A/C
- Replacing the HLHP ECU – Configuring auxiliary distributors
- Replacing the HLHP ECU – Rear distributor identification (MANUAL PROGRAMMING)
- Replacing the HLHP ECU – Rear distributor identification (SEQUENTIAL PROGRAMMING)
- Replacing the HLHP ECU – Calibrating distributor flow curves
- Replacing the HLHP ECU – Calibrating distributor flow control
- Replacing the HLHP ECU – Calibrating joystick centre position dead zone
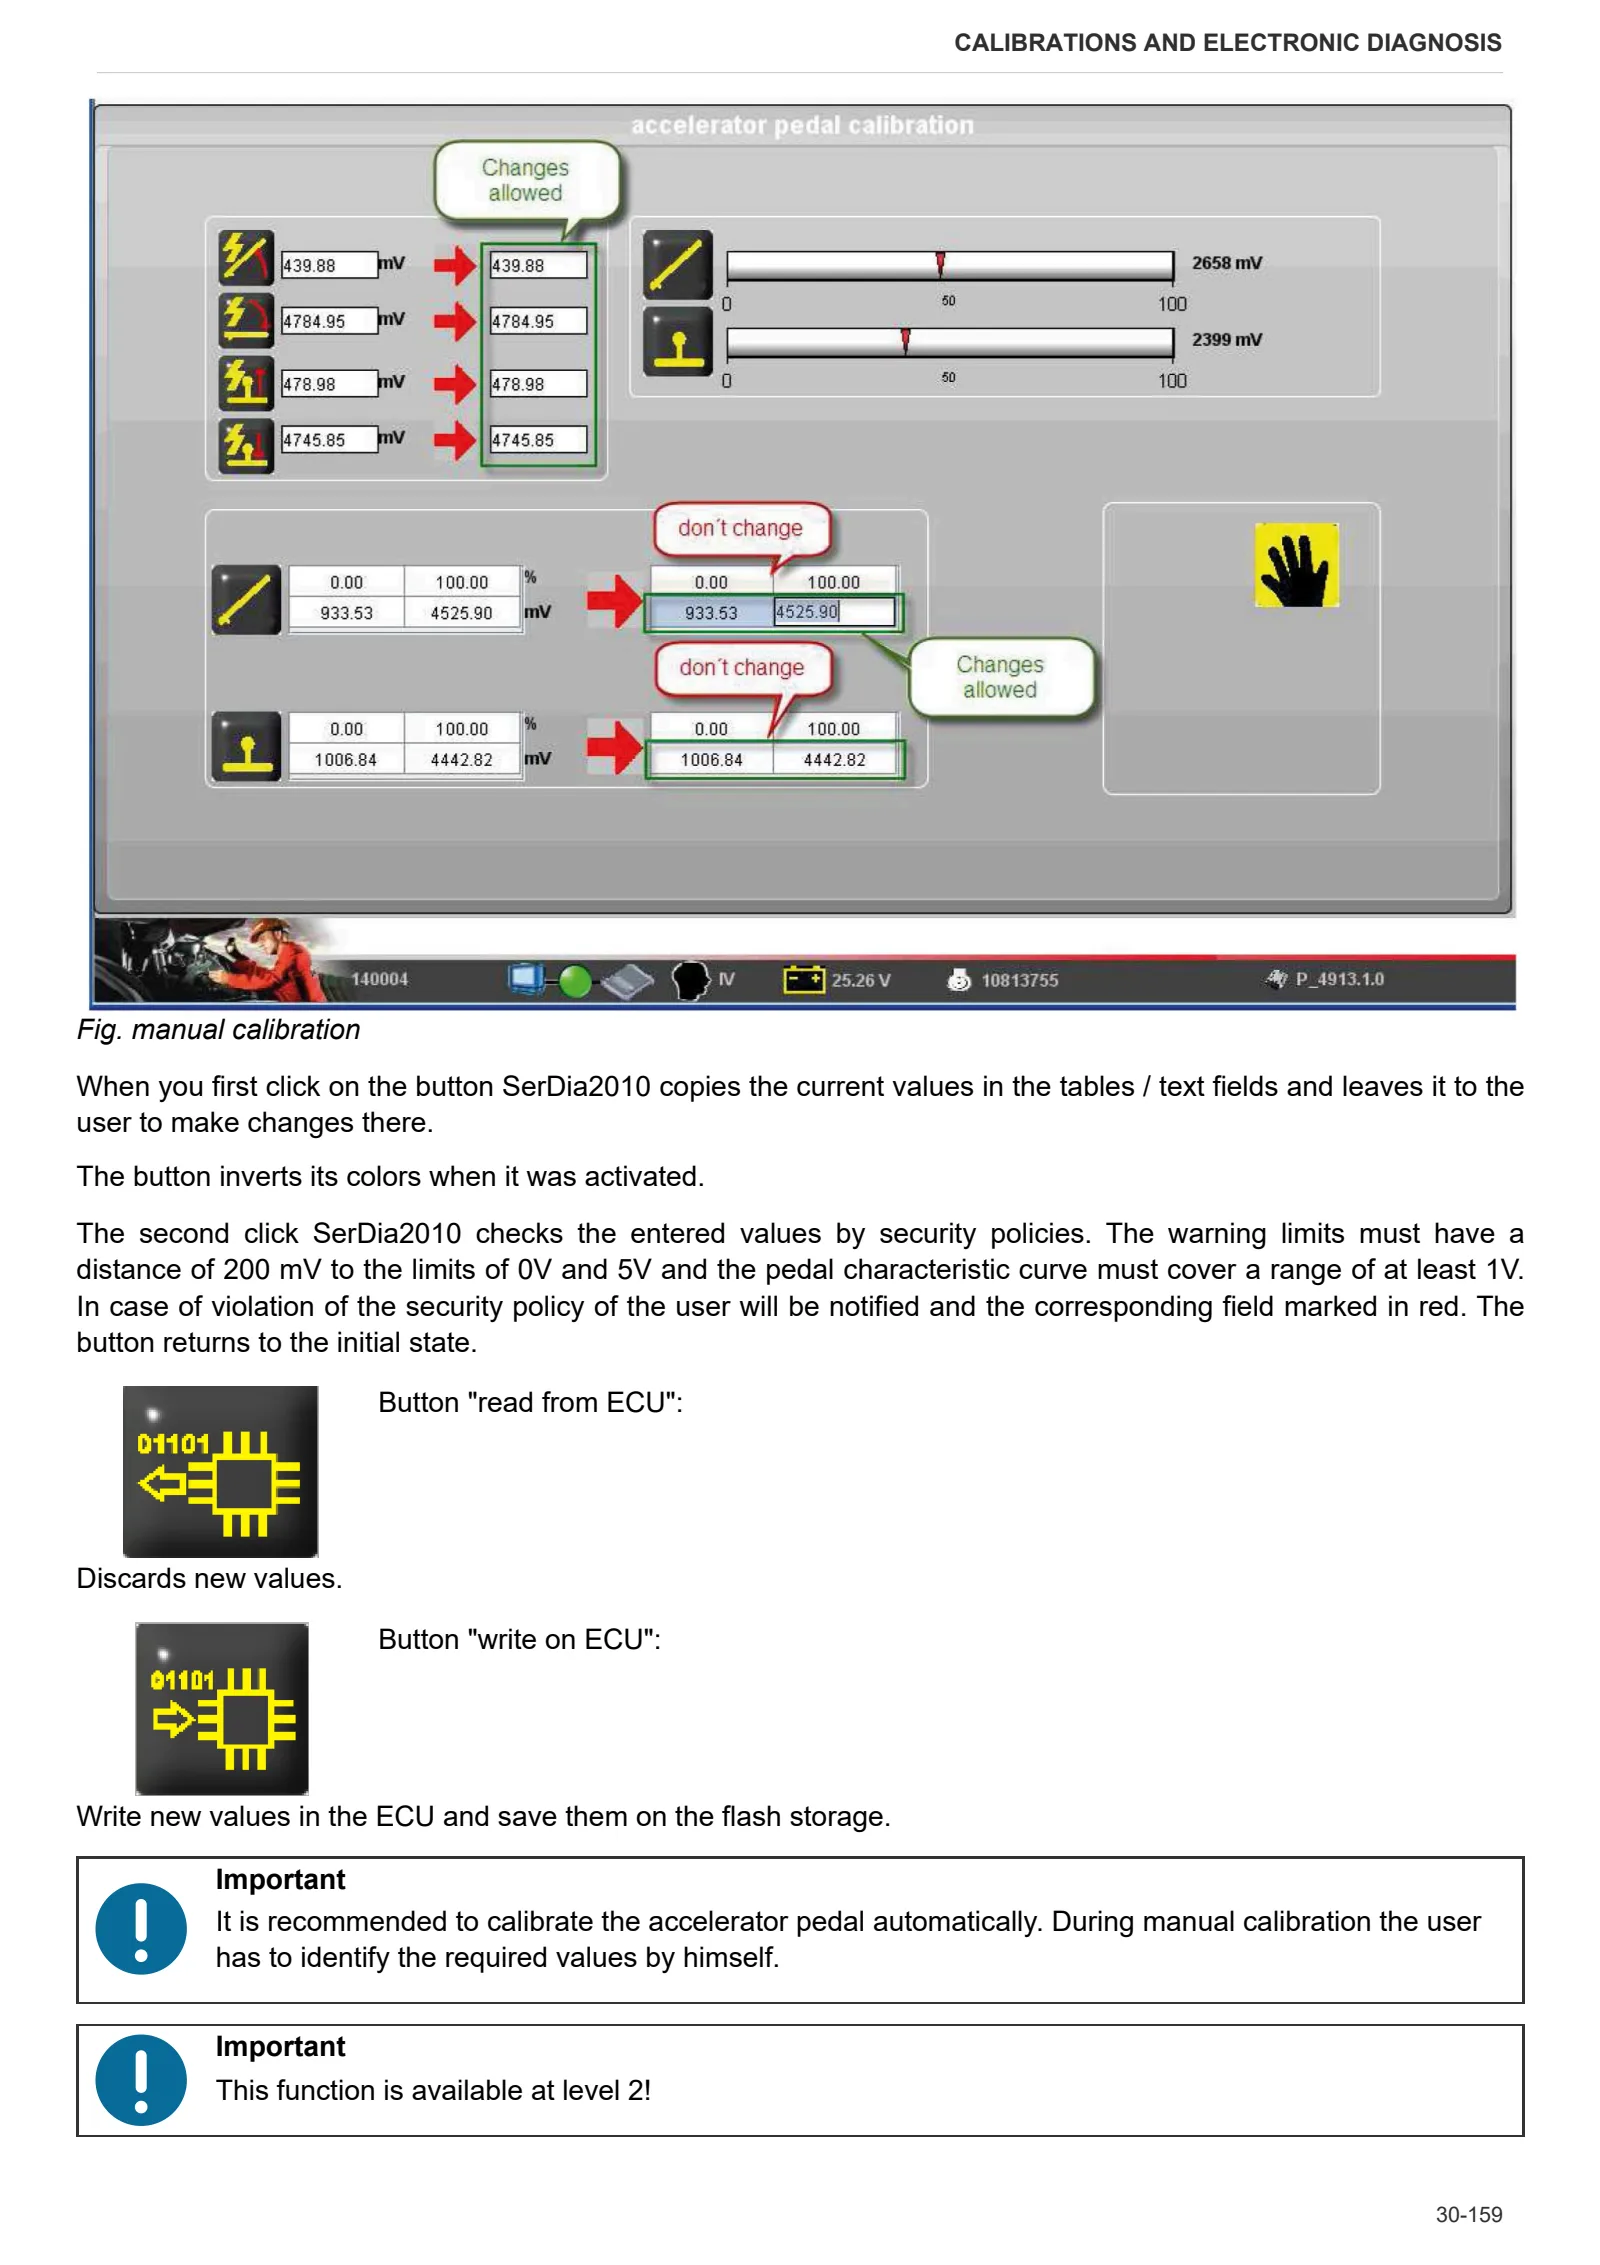
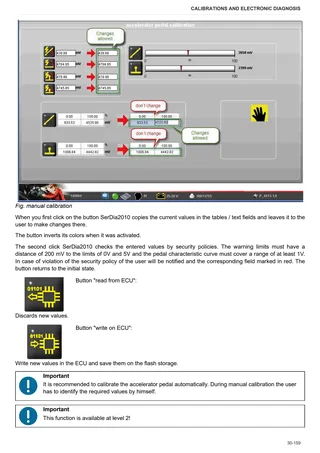
- Replacing the HLHP ECU – Calibrating the accelerator pedal
- Replacing the HLHP ECU – Calibrating the hand throttle lever
- Replacing the HLHP ECU – Calibrating engine idle and maximum speeds
- Replacing the HLHP ECU – Calibrating air conditioner
- Replacing the HLHP ECU – Calibrating the Park Brake
- Replacing the HLHP ECU – Calibrating Agrosky
- Calibrating MR-D cab
- Monitor screens for ART/PC Tester
- Test screens for ART/PC Tester
- “Alarm” screens for ART/PC tester
ECU alarms
Engine alarms
- Engine ECU Alarms: SPN 000016-000175
- Engine ECU Alarms: SPN 000190-001188
- Engine ECU Alarms: SPN 001231-003520
- Engine ECU Alarms: SPN 003532-005763
- Engine ECU Alarms: SPN 520521-523632
- Engine ECU Alarms: SPN 523633-523918
- Engine ECU Alarms: SPN 523919-524030
- Engine ECU Alarms: SPN 524031-524108
- Engine ECU Alarms: SPN 524109-524267
Transmission alarms
- Alarms – Transmission alarms
HLHP alarms
- Alarms – HLHP alarm list
AC system alarms
- Manual Air Conditioner Alarms
Electronic battery master switch alarms
- Alarm list for battery isolator (BDC)
Electrohydraulic control valve alarms
- Distributor alarms
Method of intervention
B0 – Engine
- Removal and refitting of the crankcase breather
- Removal and refitting of the crankcase breather
- Renewal of the crankshaft oil seal
- Changing the crankshaft ring gasket (flywheel side)
- Installation and removal of the crankshaft sleeve
- Removal and refitting of the front cover (fixing elements)
- Removal and refitting of the oil sump pan
- Removal and refitting of the oil filler pipe
- Removal and refitting of the V-belt pulley
- Removal and refitting of the torsional vibration damper
- Removal and refitting of the flywheel (fixing elements)
- Compression test
- Removal and refitting of the cylinder head cover
- Check and adjust valve clearances
- Removal and refitting of oil cooler (auxiliary services)
- Removal and refitting of the lube oil cooler housing
- Removal and refitting of the pilot block
- Removal and refitting of the high-pressure pump, Installation position A
- Installation and removal of the high pressure pump, Assembly position B
- Removal and refitting the injectors
- Removal and refitting of the common rail
- Removal and refitting of the charge air duct
- Removal and refitting of the charge air manifold
- Removal and refitting of the air intake pipe
- Removal and refitting of the water pump
- Removing and installing the belt tensioner (Level 1).
- Removing and installing the support plate (Level 1)
- Removing and installing the support console (Level 1)
- Removal and installation of the exhaust pipe (auxiliaries)
- Removal and refitting of the exhaust gas turbocharger
- Removing and refitting the lubricating oil pipe (exhaust gas turbocharger)
- Removal and refitting of the lubricating oil return pipe (exhaust gas turbocharger)
- Removing and installing the belt tensioner (Level 2)
- Removing and installing the vee-groove pulley (#1)
- Removing and installing the vee-groove pulley (#2)
- Removing and installing the support console (Level 2)
- Removing and installing the console (Level 1)
- Removing and installing the support console (Level 2)
- Replacing the tensioner pulley
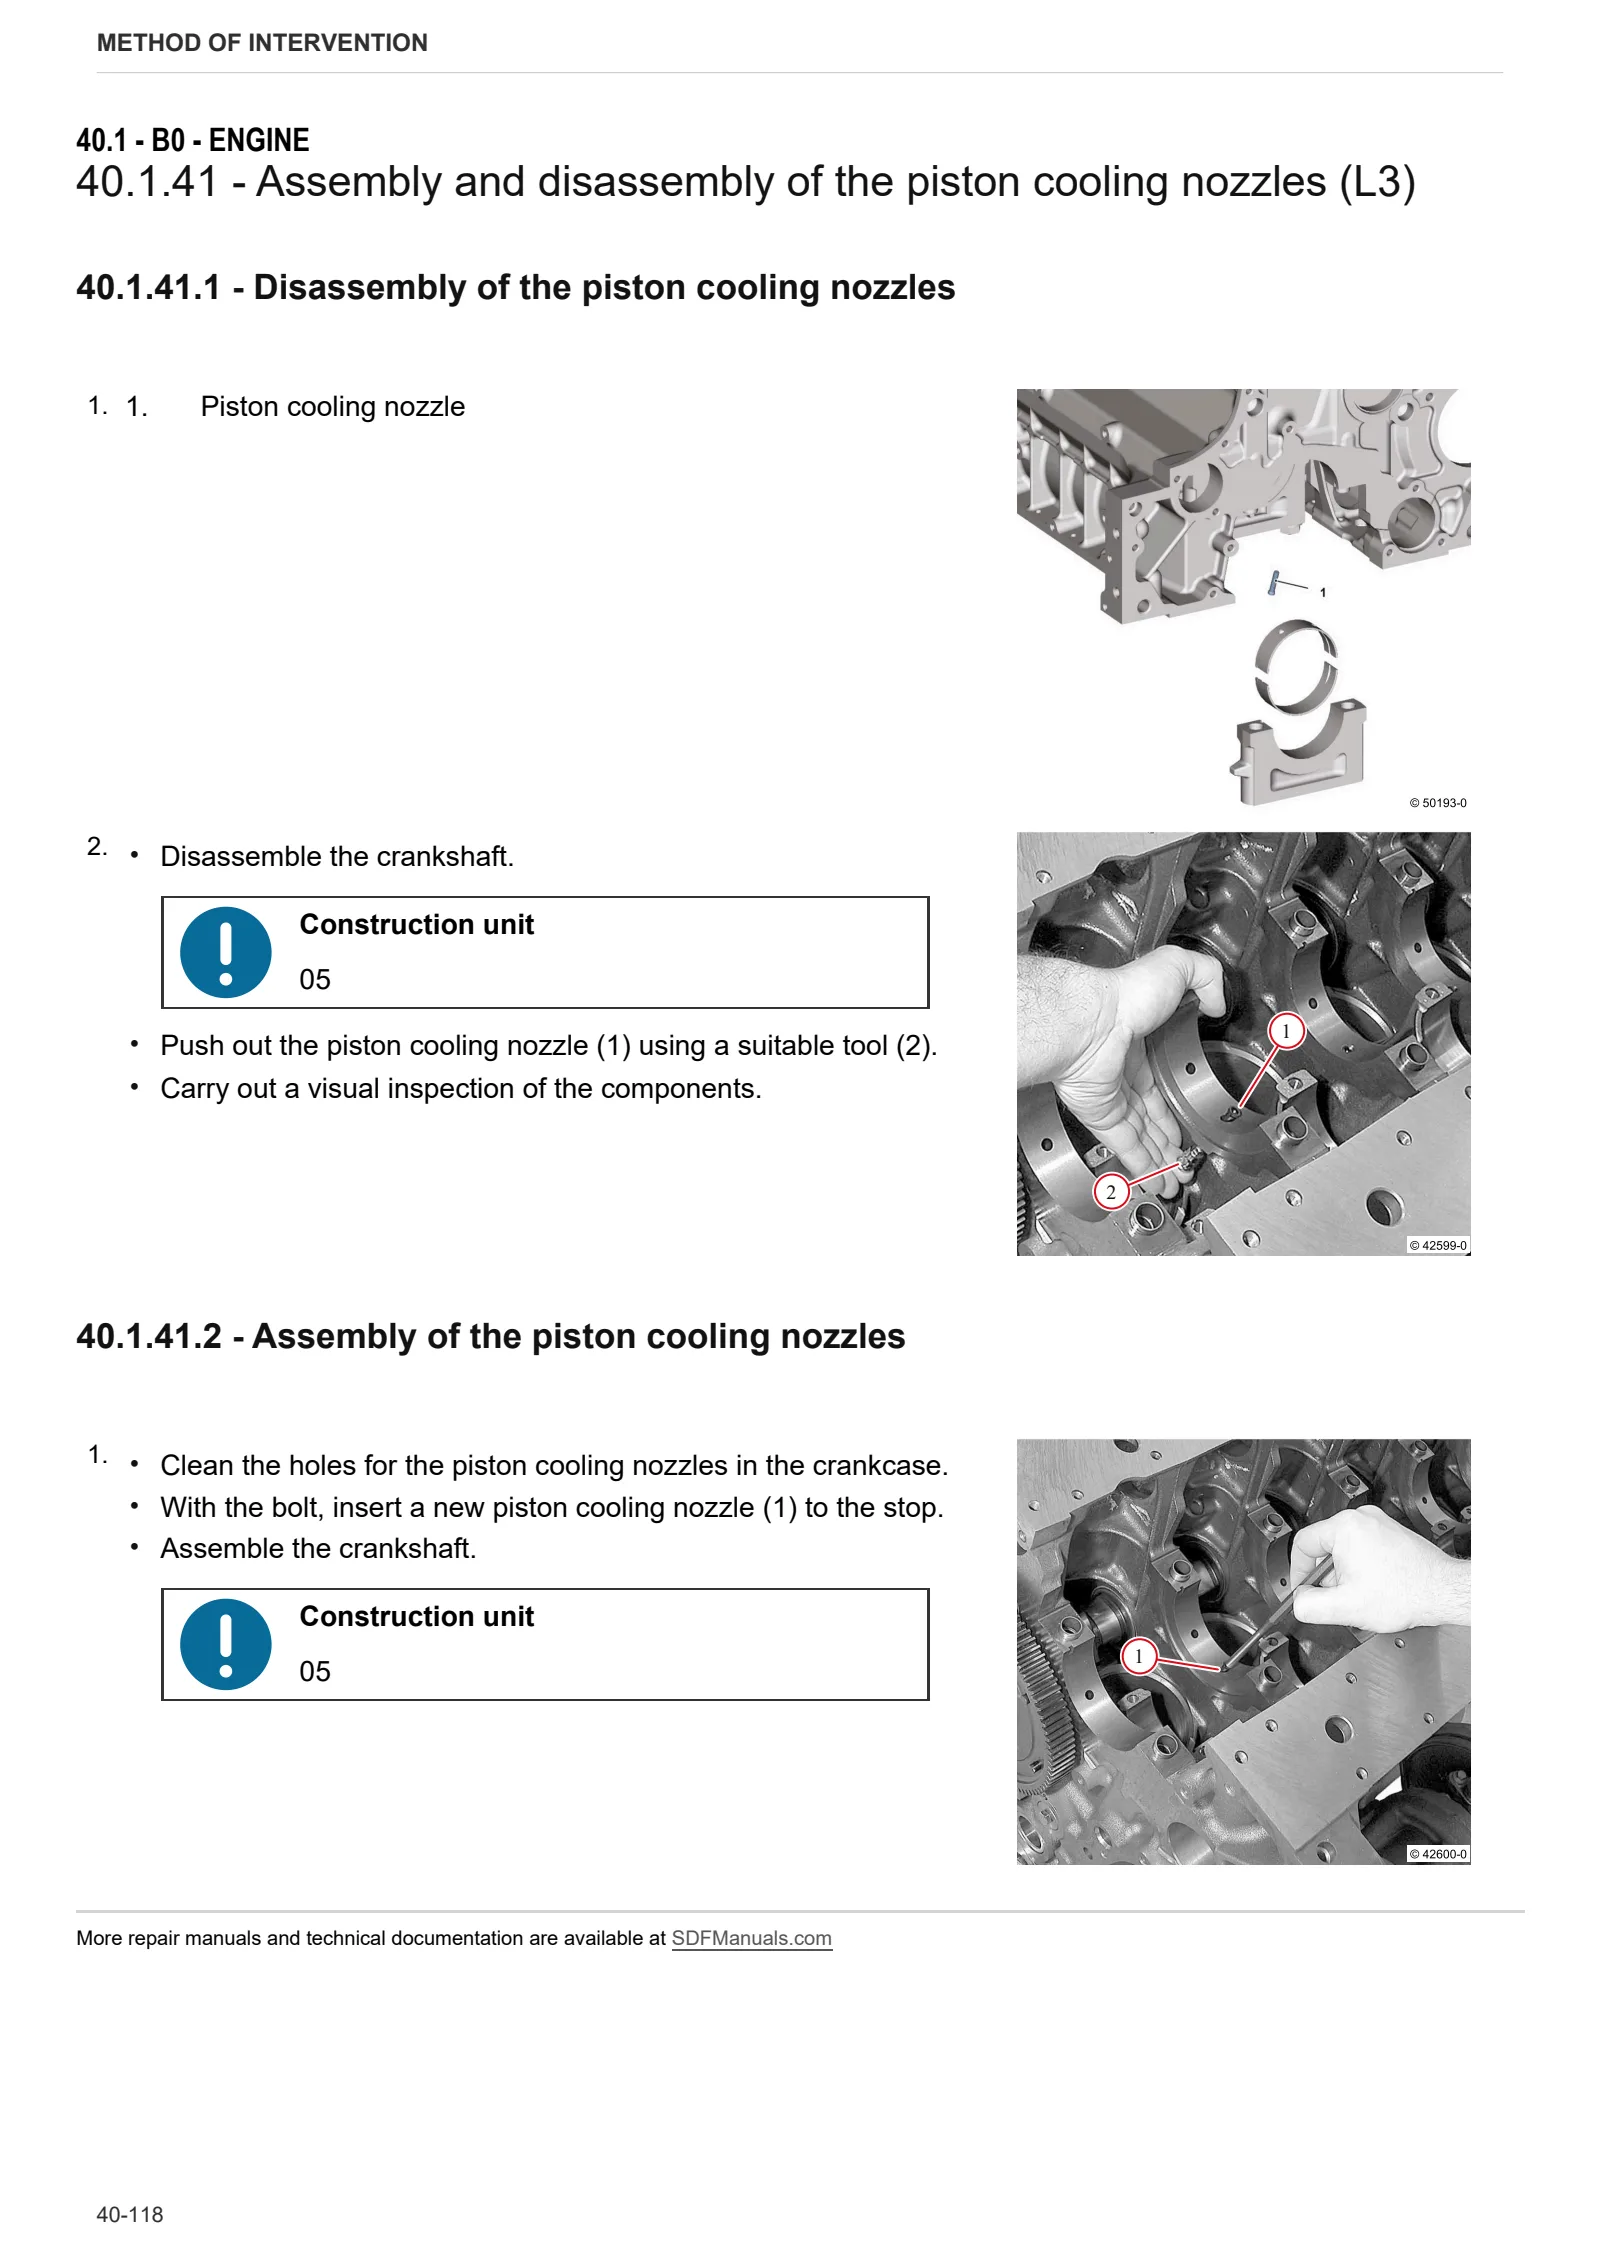
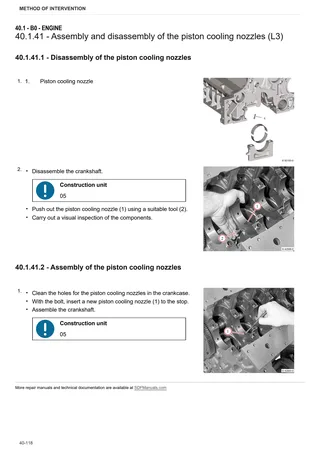
- Assembly and disassembly of the piston cooling nozzles (L3)
- Assembly and disassembly of the piston cooling nozzles (L3)
- Replacing the starter ring gear on the flywheel (L3)
- Replacing the starter ring gear on the flywheel (L3)
- Fitting and removing counterweight drive system, checking (L3)
- Assembly and disassembly of the crankshaft (L3)
- Crankshaft check (L3)
- Check the endfloat of the crankshaft (L3)
- Fitting and removing crankshaft bearings (L3)
- Check the crankshaft bearings (L3)
- Assembly and disassembly of the connecting rod drum (L3)
- Connecting rod drum check (L3)
- Replace the crankshaft O-ring (flywheel end) (L3)
- Disassembly and assembly of the gear box (L3)
- Disassembly and assembly of the gear box (L3)
- Disassembly and assembly of the gear box (L3)
- Assembly and disassembly of the camshaft (L3)
- Check the camshaft (L3)
- Assembly and disassembly of the distribution valve (L3)
- Removing and refitting the valve timing system (L3)
- Assembly and disassembly of the control elements (L3)
- Assembly and disassembly of the oil intake pipe (L3)
- Assembly and disassembly of the oil intake pipe (L3)
- Disassembly and completion of the pilot unit (L3)
- Disassembly and completion of the pilot unit (L3)
C0 – Engine accessories
- Removal and installation of the fuel filter console
- Removal and installation of the fuel lift pump
- Removal and refitting of fuel lines (fuel lift pump – pilot block)
- Removal and refitting of fuel lines (pilot block – high pressure pump)
- Removal and refitting of fuel lines (pilot block – fuel lift pump)
- Removal and refitting of fuel lines (rail, cylinder head, pilot block – fuel filter)
- Removal and refitting of the heater
- Removal and refitting of the heater (details)
- Installing and removing the thermostat
- Thermostat check (with thermostat disassembled)
- Removal and installation of the thermostat housing
- Removal and refitting of the fan support
- Removal and assembly of the fan support
- Installing and removing the temperature transmitter (Exhaust gas)
- Removal and refitting of the starter motor
- Removal and refitting of the alternator (ribbed V-belt, level 2)
- Removal and refitting of the alternator (ribbed V-belt, level 1)
- Removal and refitting of the crankshaft speed sensor
- Removal and refitting of the camshaft speed sensor
- Installation and removal of the rotation device
- Installation and removal of the rotation device (torsional vibration damper)
- Removal and installation of the air conditioning compressor
- Exhaust gas temperature sensor
D0 – Transmission
- Separating drivetrain components
- Removing the Powershift unit
- Disassembl e clutch A/C
- Disassembly clutch B/D
- Disassemble clutch F/G
- Complete clutch shaft A/C
- Complete clutch shaft B/D
- Complete clutch shaft F/G
- Removing the clutch housing
- Completing clutch housing
- Removing the pump drive gear
- Removing the front-wheel drive shaft
- Fitting the front-wheel drive shaft
- Disassemble crawler gear shifting
- Disassemble main clutch
- Fitting main clutch and creeper gear unit
- Fitting assembled main clutch and creeper gear unit
- Fitting the main clutch pressure regulator
- Disassemble shift control (mechanical)
- Removing the main clutch
- Disassemble countershaft
- Disassemble pump drive gear
- Preassemble transmission housing
- Reassemble pump drive gear
- Preassemble countershaft
- Fitting the main shaft
- Mount shift control (mechanical part)
- Fitting the pump drive gear
- Removing the hydraulic control system
- Fitting the hydraulic control system
- Remote control
- Assembling Powershift unit on main transmission unit
- Installing main transmission unit on rear axle
- Fitting oil feed line and travel stop piston
E0 – Rear axle
- Rear axle
- Disassembling the axle funnel
- Dismantling the brake
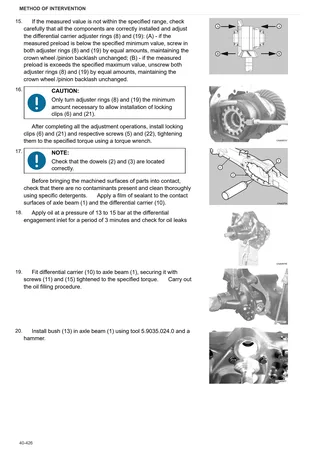
- Dismantling the differential
- Removing PTO gear
- Dismantling the oil supply
- Dismantling the linkage
- Pre-assembling the rear axle housing
- Assembling the linkage
- Assembling the oil supply
- Assembling the control unit
- Assembling the valve block
- PTO gear assembly
- Assembling the PTO shaft coupling
- Assembling PTO shaft shift unit
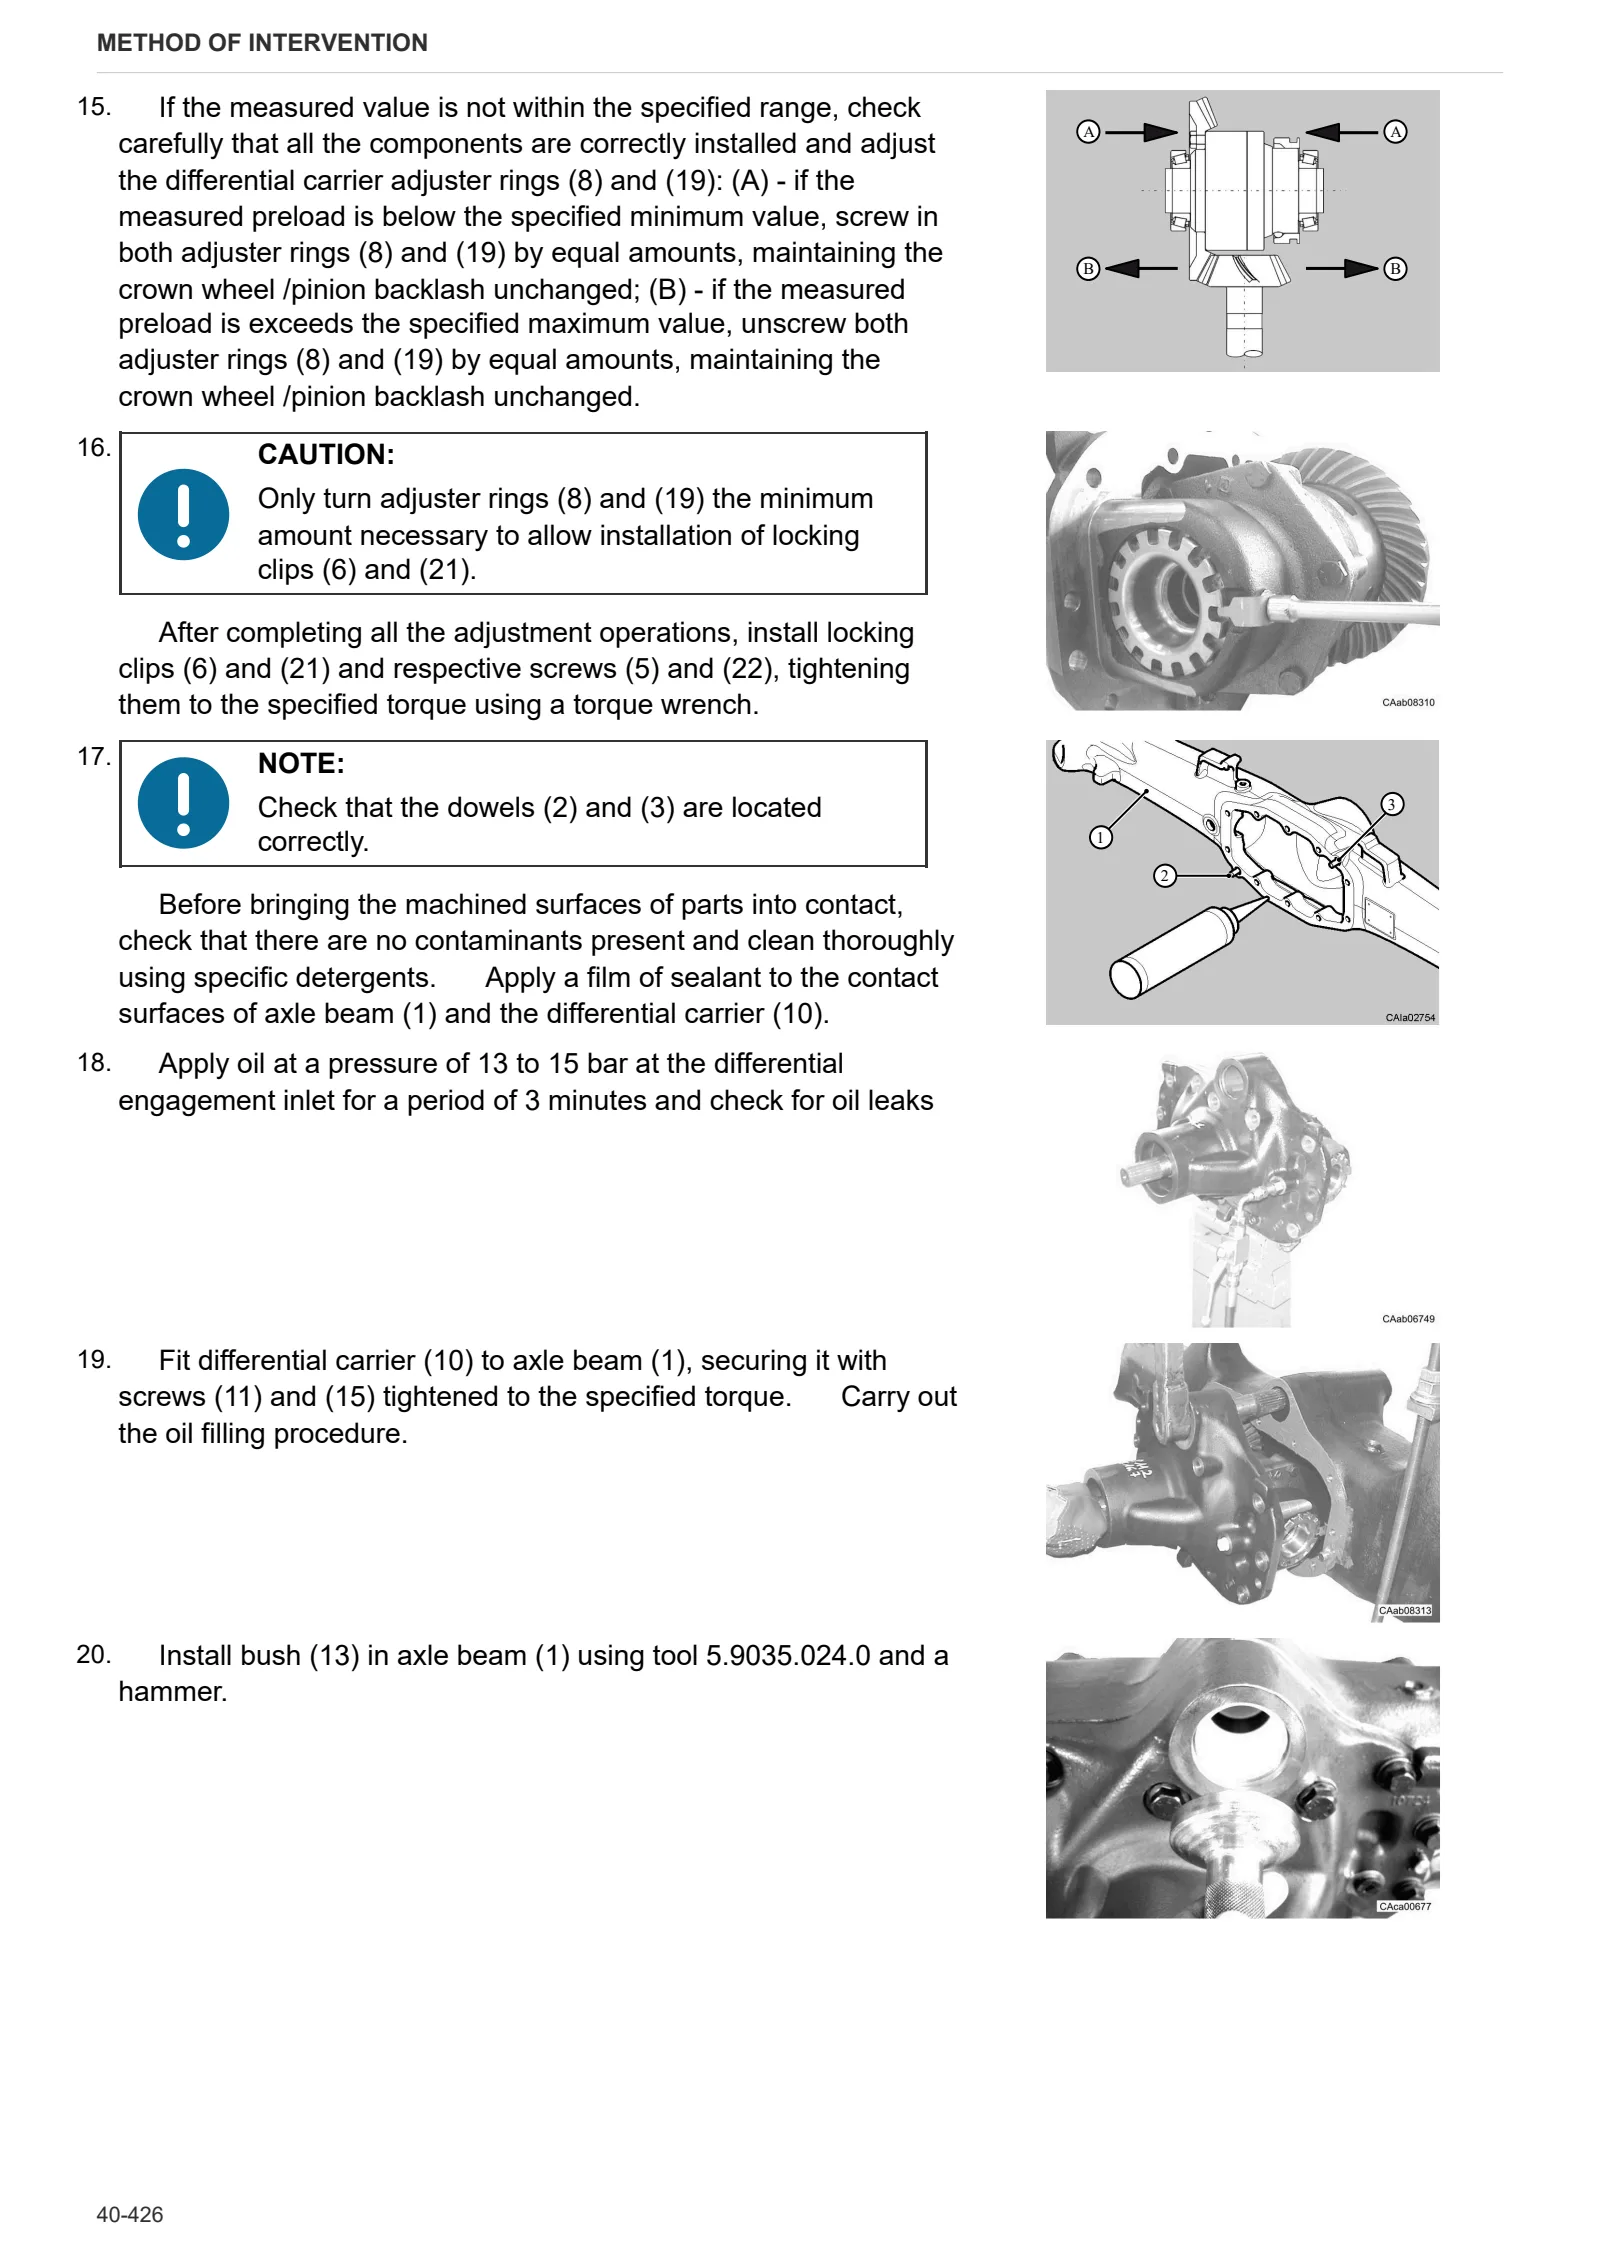
- Assembling the differential
- Assembling the brake
- Setting the rear wheel brake
- Fitting the axle housing
- Attaching complete rear axle to the transmission casing
F0 – Front axle
- Troubleshooting
- Steering cylinders assembly
- Axle shaft assembly
- Differential assembly – carrier
- Toe-in/steering angle/assembly tests
- Differential disassembly – ML version
- Differential disassembly – LS version
- Checking the bevel gear pair
- Flange assembly
- Bevel pinion assembly
- Planetary reduction gear assembly
- Planetary reduction gear assembly
- Wheel hub assembly
- Brake assembly
H0 – Hydraulic system
- Instruction for bleeding the brakes
V0 – Ballast – towing hitches
- Tightening Torques for Tow Hitches
- Standard fastener hardware: Tightening torque/Tension forces
V1 – AFTERMARKET KITS
- Installation of the air conditioning kit
Wiring diagrams
Components
- A – Starting and charging
- B – Fuses
- C – Grounds
- D – Intermediate connections
- E – On-board instruments and visual and audible indicators
- F – External lights (rotating beacon)
- G – Interior lights
- H – Manual electrical controls (steering column switch)
- I – Circuit breakers
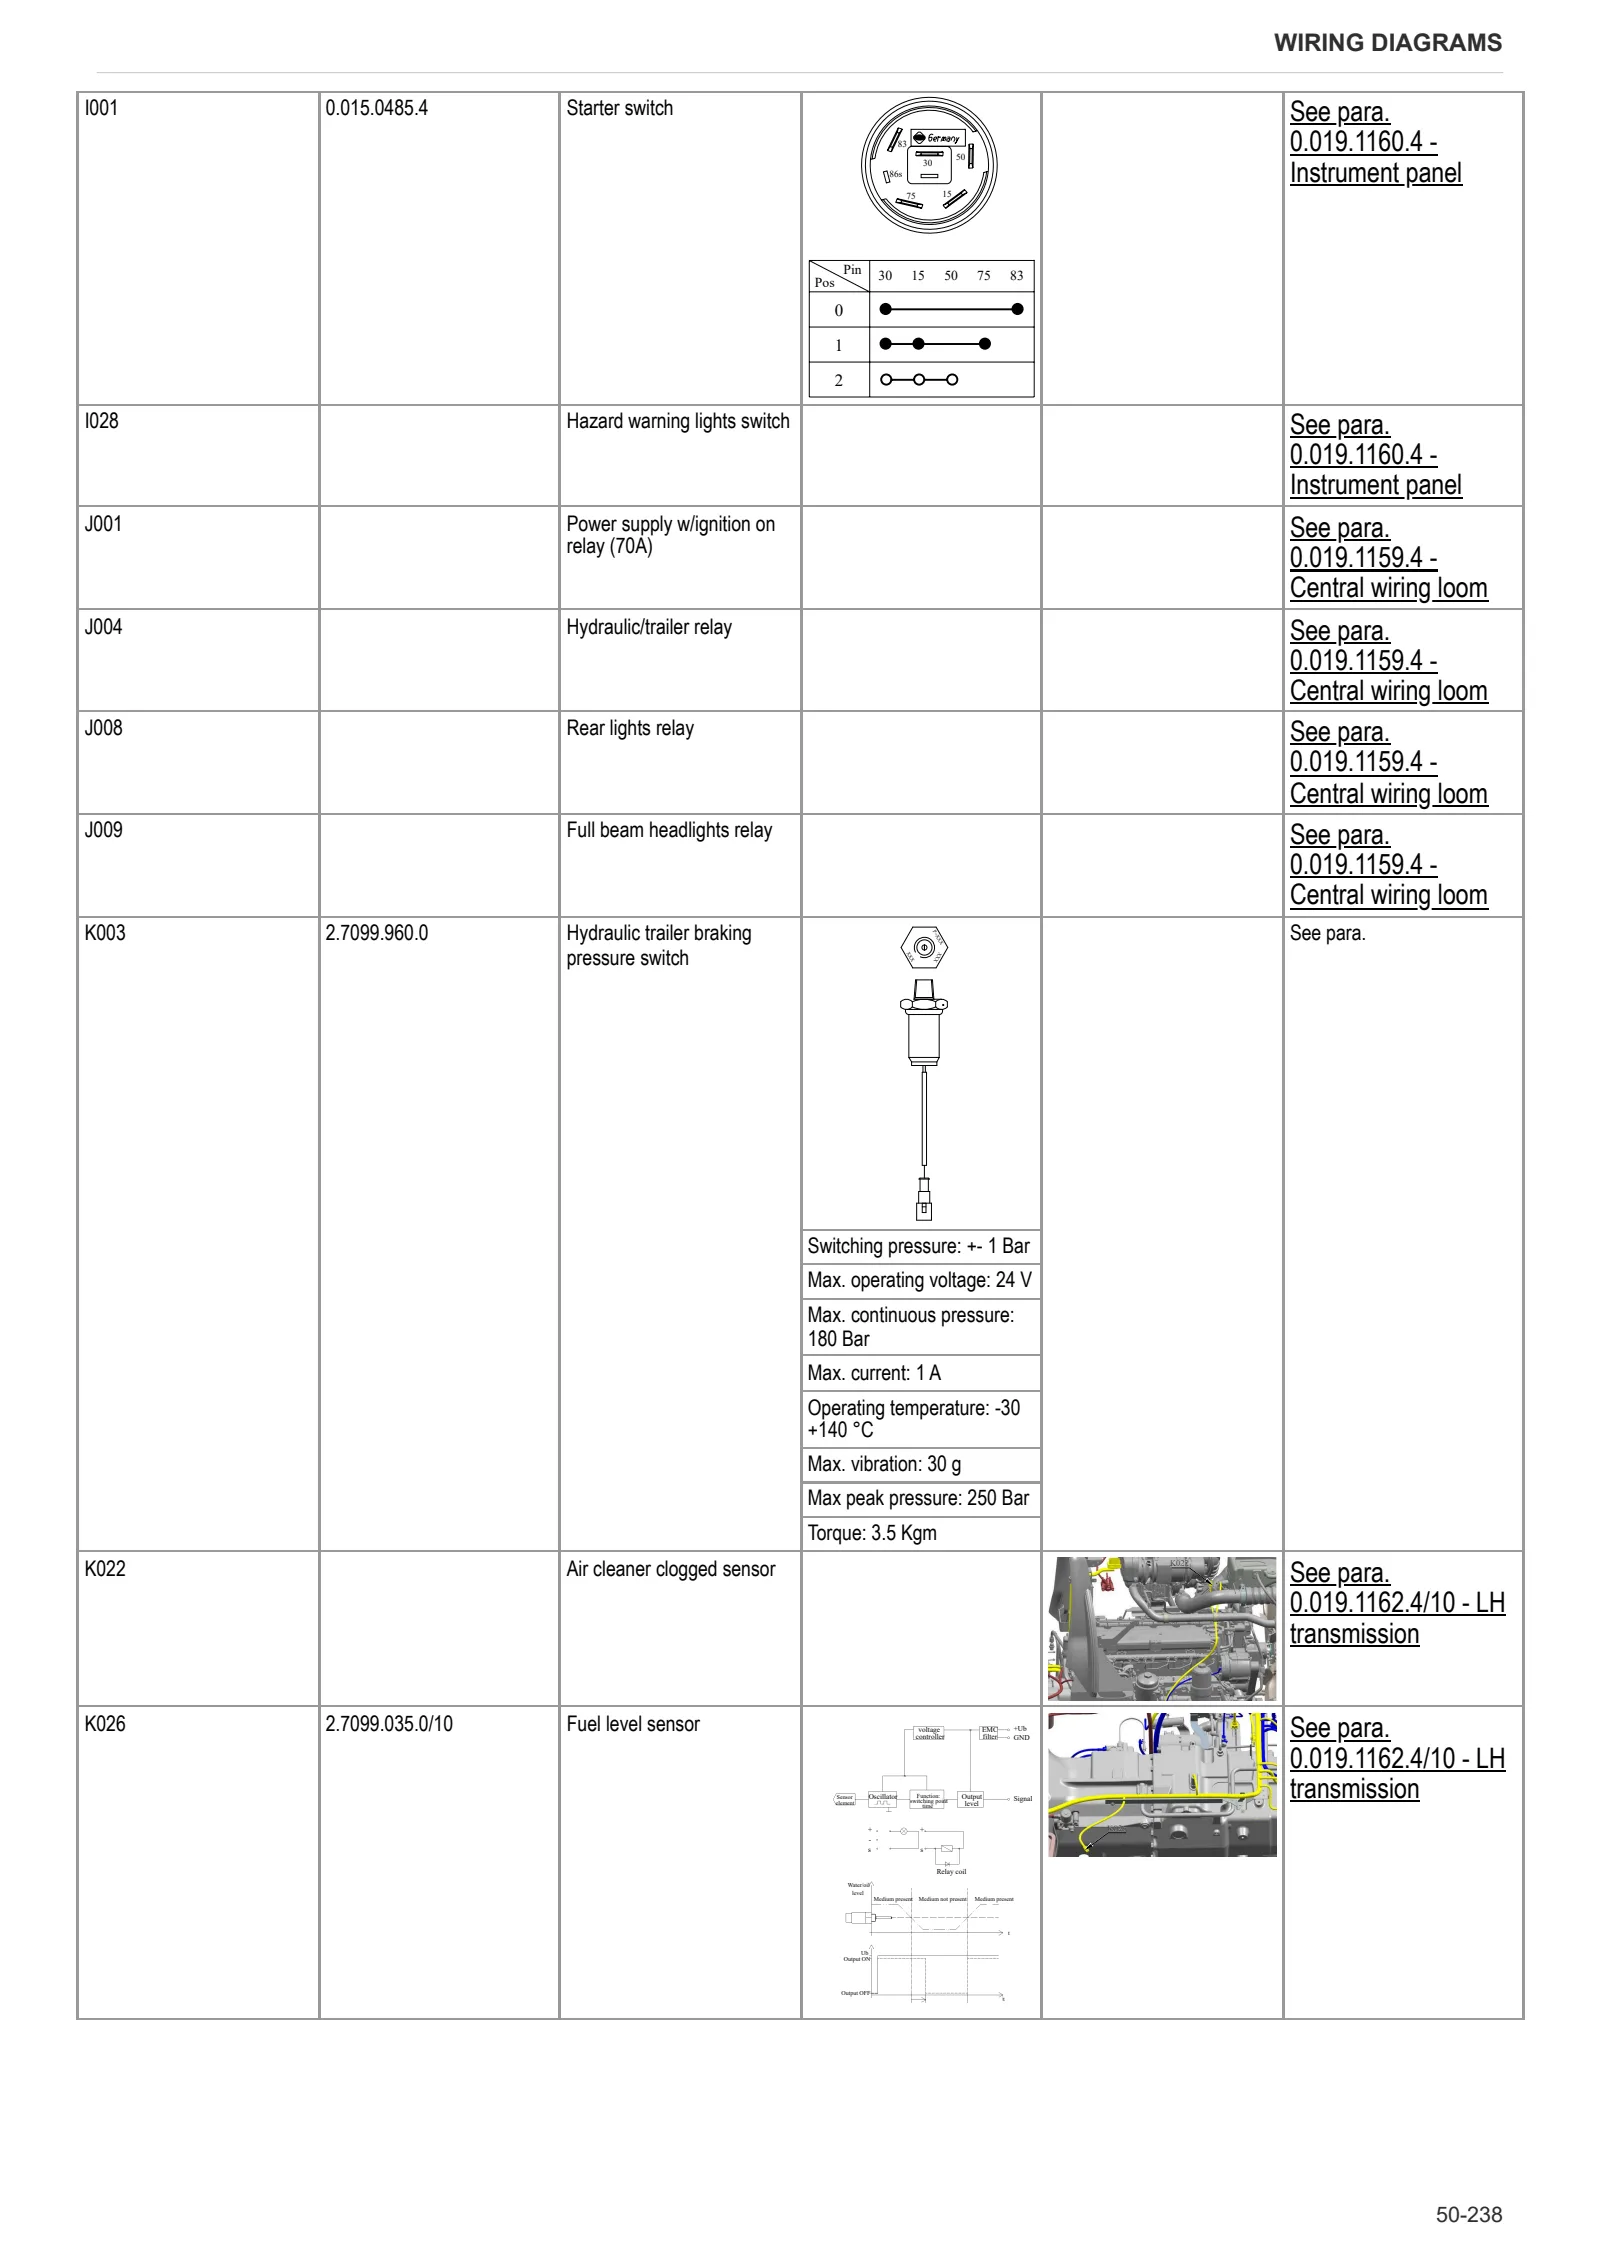
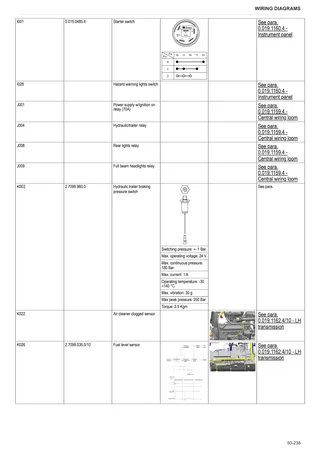
- J – Relays
- K – Sensors and transmitters
- L – Electromagnets and solenoid valves
- M – Electrical/electronic devices, Flasher units and Timers
- N – Electric motors and actuators
- O – Resistors and rheostats
- P – Various services
- R – Diagnostics
Systems
- S001 – Electronic engine governor
- S002 – Preheating
- S003 – Starter
- S004 – AdBLue
- S005 – Distributors
- S006 – Lights (ITA)
- S006 – Lights (USA)
- S007 – Work lights (ITA)
- S007 – Work lights (USA)
- S008 – Windscreen wiper
- S009 – Instrument panel (ITA)
- S009 – Instrument panel (USA)
- S010 – Audio system and i-Monitor
- S011 – Front and rear lifts
- S012 – Transmission
- S013 – PTO (ITA)
- S013 – PTO (USA)
- S014 – Accessories
- S015 – Can Bus
- S016 – CAN BUS – engine line
- S017 – Brakes (ITA)
- S017 – Brakes (USA)
- S018 – Trailer brakes – hydraulic braking (ITA)
- S019 – Front axle suspension
- S020 – Air conditioner
- S021 – Diagnostics
- S022 – ISO 11783 line
- S023 – CAN BUS with ISO line
Wiring harnesses
- 0.012.2018.4/20 – Number plate light
- 0.014.0007.4/10 – Lights selector switch
- 0.014.5144.4/10 – Battery negative
- 0.014.9570.4/10 – ISO socket system
- 0.015.3974.4/10 – Front axle suspension
- 0.015.4257.4/10 – PTO sensor – (USA EXPORT)
- 0.015.5429.4/20 – Front lift electrical system
- 0.016.0642.4/20 – Rear lower work lights XENON version
- 0.016.0650.4/10 – Supplementary work lights on arm (XENON)
- 0.017.0052.4/10 – Roof
- 0.017.0053.4/20 – Rear lights (for wide mudguards)
- 0.017.0164.4 – Video camera
- 0.017.0382.4/20 – I-monitor
- 0.017.0383.4/10 – Multimedia system electrical system
- 0.017.0496.4/10 – Low-mounted front work lights
- 0.017.0497.4/20 Low rear work lights
- 0.017.8425.4 – Trailer socket (EU)
- 0.017.8426.4 – Trailer socket (USA)
- 0.017.9761.4/10 – Front distributors
- 0.017.9762.4/10 – Rear distributors
- 0.018.0017.4/10 – Mudguard – Version with extensions (U.S.A.)
- 0.018.1021.4 – Amplifier
- 0.018.2800.4 – Hydraulic braking ITA
- 0.018.3510.4/30 – Fuses and relays
- 0.018.8803.4 – Battery positive terminal
- 0.018.9840.4 – ISO 11783 – Rear line
- 0.019.1159.4 – Central wiring loom
- 0.019.1160.4 – Instrument panel
- 0.019.1161.4 – RH transmission
- 0.019.1162.4/10 – LH transmission
- 0.019.1164.4 – AdBlue
- 0.019.1165.4 – Engine cowl
- 0.019.1167.4 – USA Hazard
- 0.019.2378.4 – Rear mudguards
- 0.019.2615.4 – ISO 11783 – Cab line
- 0.019.9892.4 – Engine
- 0.900.0816.0 – Front PTO
- 0.900.1582.4 – Air conditioning
- 04217216 – Preheating relay power supply
- 04217217 – Preheating
- 04217865 – Engine
- 0441.1923.4 – Lower headlights
- 0441.2045 – Windscreen wiper motor
- 0442.8092.4 – Sidelights and front direction indicators
- 0443.6707 – Flashing light
Service Info
A0 – TRACTOR
- Diagnostics 2026 subscription
- After-sales 2026 subscription
- SERVICE NEWS RESEARCH GUIDE
- Diagnostics 2025 subscription
- After-sales 2025 subscription
- Diagnostics 2023 subscription
- Diagnostics 2024 subscription
- Diagnostics 2022 subscription
- Diagnostics 2021 subscription
- After-sales 2024 subscription
- After-sales 2023 subscription
- After-sales 2022 subscription
- After-sales 2021 subscription
- After-sales 2019 subscription
- SDF Parts and SDF Service DVV 04/2014, version 26
- New function: Download PDF manuals
- Diagnostics – 2020 subscription
- After-sales – 2020 subscription
- After-sales – 2018 subscription
- Service and Spare Parts – 2017 Subscription
- SDF Parts and SDF Service DVDs 05/2014 version 25
- SDF Parts and SDF Service DVDs 03/2013 version 24
- DiagnosiS EMR 4 – Serdia 2010
B0 – ENGINE
- Flushing the lubrication circuit
- Deutz AG engine oil specifications
- SerDia 2010 updating license file
C0 – ENGINE ACCESSORIES
- Diagnostic protocol – AdBlue – Float level unit
- AdBlue feed pump cleaning
- AdBlue system trouble shooting
- AdBlue crystallization
- Solid urea deposits in catalytic converter
- NOx sensor (Generation 2.0/2.5)
- Filter and prefilter tool p/n 5.9035.865.0
F0 – FRONT AXLE
- Check the front axle steering knuckles for wear
- Steering behavior check procedure
G0 – BODYWORK – CAB
- Air conditioning system recharging
H0 – HYDRAULIC AND PNEUMATIC SYSTEM|
- Hydraulic CUNA trailer braking kit (ITALY)
- Single connection hydraulic braking kit availability update – only for EUROPEAN market
- Spool valve malfunction
- L0 – ELECTRIC AL SYSTEM