


Document overview
Operator's manual for DEUTZ FAHR 5110 G → ZKDDE60200TD10001 from the Series 5 G (FARMOTION STAGE 4) family. Digital PDF in English, 438 pages.
The original table of contents contains 82 sections and 280 detailed topics, providing a clear view of the systems and procedures covered by this edition.
- IDENTIFICATION
- SAFETY
- GETTING TO KNOW YOUR TRACTOR
- USING THE TRACTOR
- WHEELS
- BALLASTING
- ELECTRICAL SYSTEM
- MAINTENANCE OPERATIONS
- TROUBLESHOOTING OF FAULTS AND EMERGENCIES
- FRONT LOADER
- TECHNICAL DATA
Document details
- Brand: DEUTZ FAHR
- Family: Series 5 G (FARMOTION STAGE 4)
- Model: 5110 G
- Starting serial number: ZKDDE60200TD10001
- Document type: Operator's manual
- Language: English
- Pages: 438
- File size: 48.60 MiB
- Format: Digital PDF download
Compatibility
Before purchasing, verify that the model and starting serial number of your machine match 5110 G → ZKDDE60200TD10001.
Complete table of contents
IDENTIFICATION
Tractor identification
- Models and serial numbers
- Make a note of your tractor data
- Ordering spare parts and supplementary equipment
- Identification plates
- Change of ownership of the tractor.
Glossary
- Technical terms used in this manual
- Acronyms used in this manual
- Units of measurement used in this manual and conversion factors
Warranty
- Warranty terms and conditions
- Exclusions to the warranty
- Intended use
- Conditions rendering the warranty null and void
Component icons
- Icons used in this manual
SAFETY
Preface
- Operator safety manual
- About this manual
- Responsibilities and obligations
Important safety information
- Correct and incorrect use of the tractor
- Recognising hazards
- Indications for persons in contact with the tractor
Safety prescriptions
- Danger areas
- Risks during tractor preparation
- Risks when driving in the field and on the road
- Risks during maintenance
- Using the front loader
Safety and protection devices
- Safety devices
- Protective devices
- ROPS roll bar
Good practice
- Good working practices
Safety pictograms
- Introduction to safety pictograms
- Safety pictograms
Hazards connected to the environment
- Hazards associated with the operating environment
- Hazards on the tractor
GETTING TO KNOW YOUR TRACTOR
Views of the tractor
- External views of the tractor
- Views of cab interior
Boarding the vehicle
- Access to the driver seat
Cab
- Operator Protective Structure.
- Internal illumination
- Openable roof hatch
- Windscreen hatch
- rear window hatch
- Air conditioning vents
- Document pocket for the operator’s manual
Instruments and controls
- Front console and pillars (mechanical reverse shuttle)
- Instrument cluster
- Left hand console
- Right hand console (with mechanically controlled rear lift)
- Right hand console (with electronically controlled rear lift)
- Roof panel
- Provision for installation of radio and speakers
- Provision for fire extinguisher
USING THE TRACTOR
Boarding the vehicle
- Accessing and getting down from the tractor cab
- Emergency exit
Initial adjustments
- Adjusting the steering wheel
- Adjusting the GRAMMER MSG85/721 operator seat
- Adjusting the GRAMMER MSG83/721 operator seat
- Adjusting the GRAMMER MSG95 AL/721 operator seat
- Adjusting the GRAMMER MSG95G/721 operator seat
- Fastening and unfastening the operator’s seat belt
- Passenger seat
- Manually adjusting the rear-view mirrors
Commonly used controls
- Mechanical reverse shuttle lever
- Steering column stalk
- Clutch pedal
- Accelerators
- Brakes
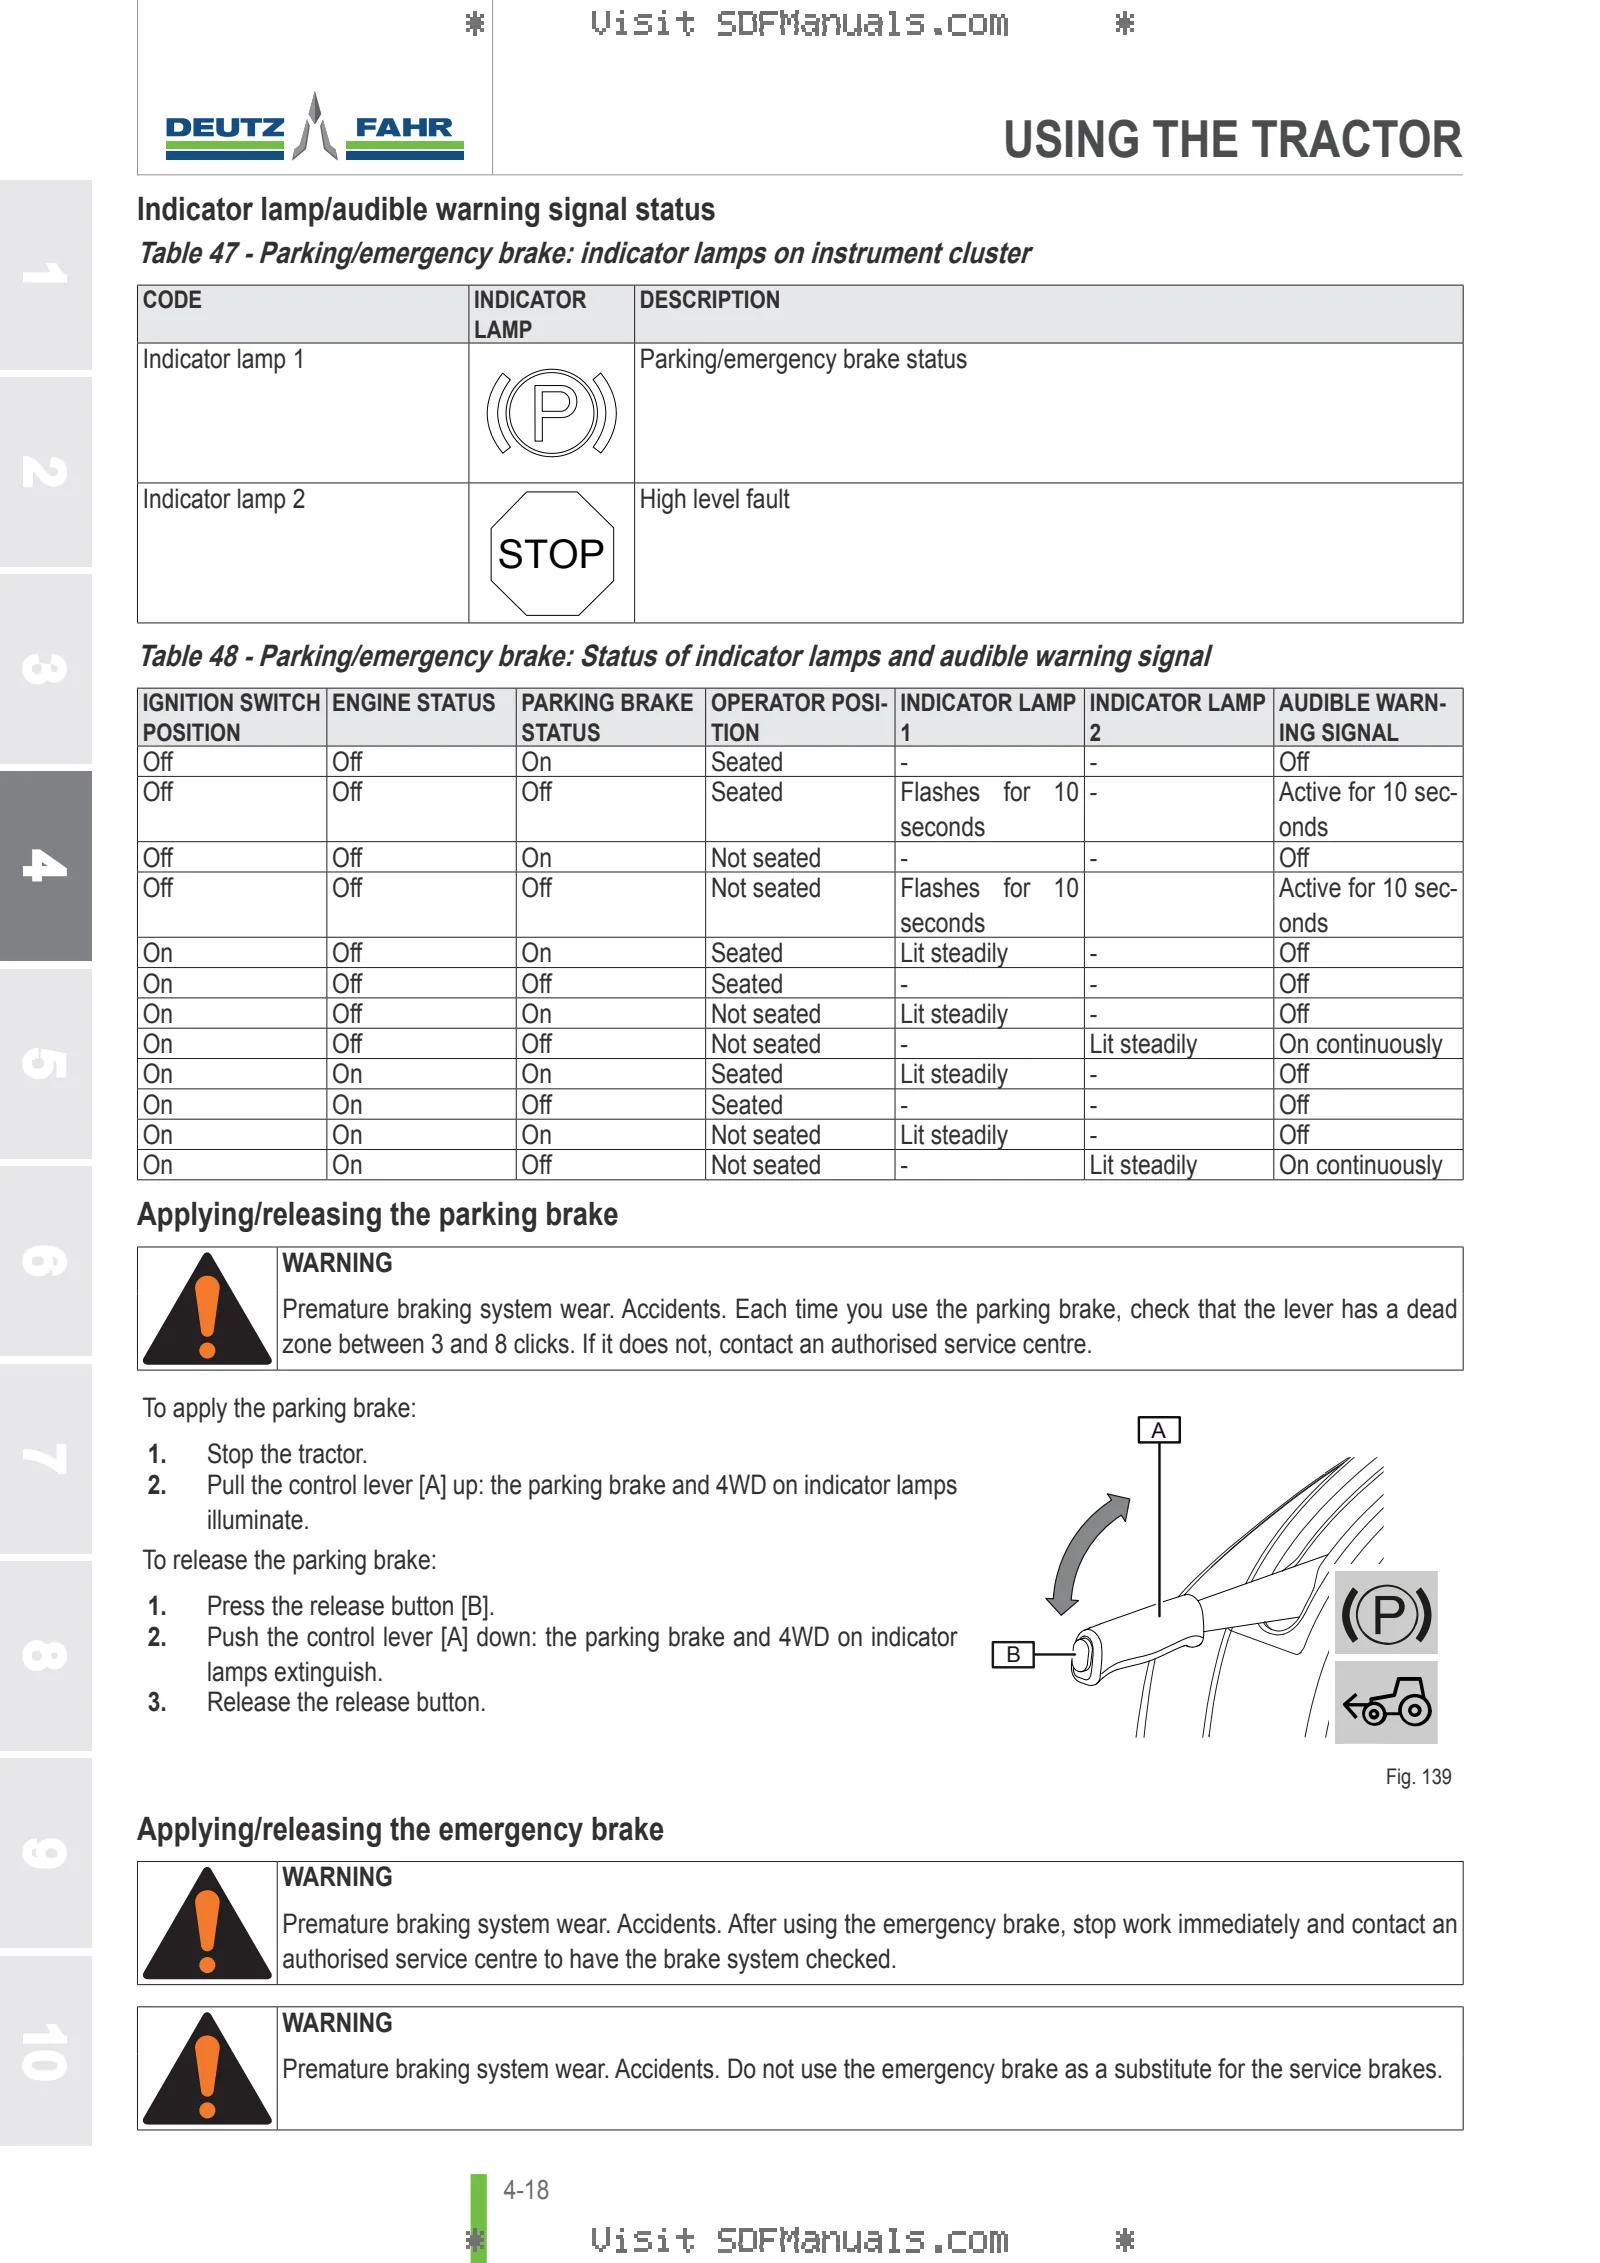
- Parking/emergency brake
- Parking brake/emergency brake
- Rapid steer system (SDD)
- Cab air conditioning
Parking the vehicle
- Leaving the tractor in safe conditions
- Immobilising the tractor using the wheel chocks
- Leaving the tractor safely with a trailer hitched
Engine
- Recommendations for first 50 operating hours
- Fuels and additives
- AdBlue®
- Refuelling
- Filling the AdBlue® system
- Starting and stopping the tractor
Transmission
- Introduction to the transmission
- Transmission controls and indicator lamps (mechanical reverse shuttle)
- Selecting work range, gear and drive direction
- Driving the tractor
- Front wheel drive and differential locks
PTO
- PTO configurations
- Coupling and uncoupling PTO-driven implements
- Changing the PTO output shaft
- Managing PTO for stationary tasks
Front PTO
- Front PTO – description and versions
- Front PTO controls and indicator lights
- Operating the front PTO from the cab
Rear PTO
- Rear PTO description and configurations
- Rear PTO controls and indicator lamps
- Operating the rear PTO from the cab
- Operating the rear PTO from the ground
- Use of the rear ground speed PTO
- Rear PTO in automatic mode (versions with electronically controlled rear lift)
Lifts
- Lift configurations
- Correct practice for transporting implements
Front lift
- Front lift
- Front linkage controls
- Operating the front linkage from the cab
- Adjusting the front lift
- Attaching/detaching implements to/from the front lift
Rear lift
- Rear lift
- Mechanical rear lift controls
- Setting the operating mode of the mechanical rear lift
- Operating the mechanical rear lift from the cab
- Operating the mechanical rear lift from the external controls
- Electronic rear lift: indicator lamps and controls
- Setting the electronic rear lift control functions
- Operating the electronic rear linkage from the cab
- Operating the electronically controlled rear lift from the ground
- Rear 3-point linkage
- Adjusting the 3-point linkage
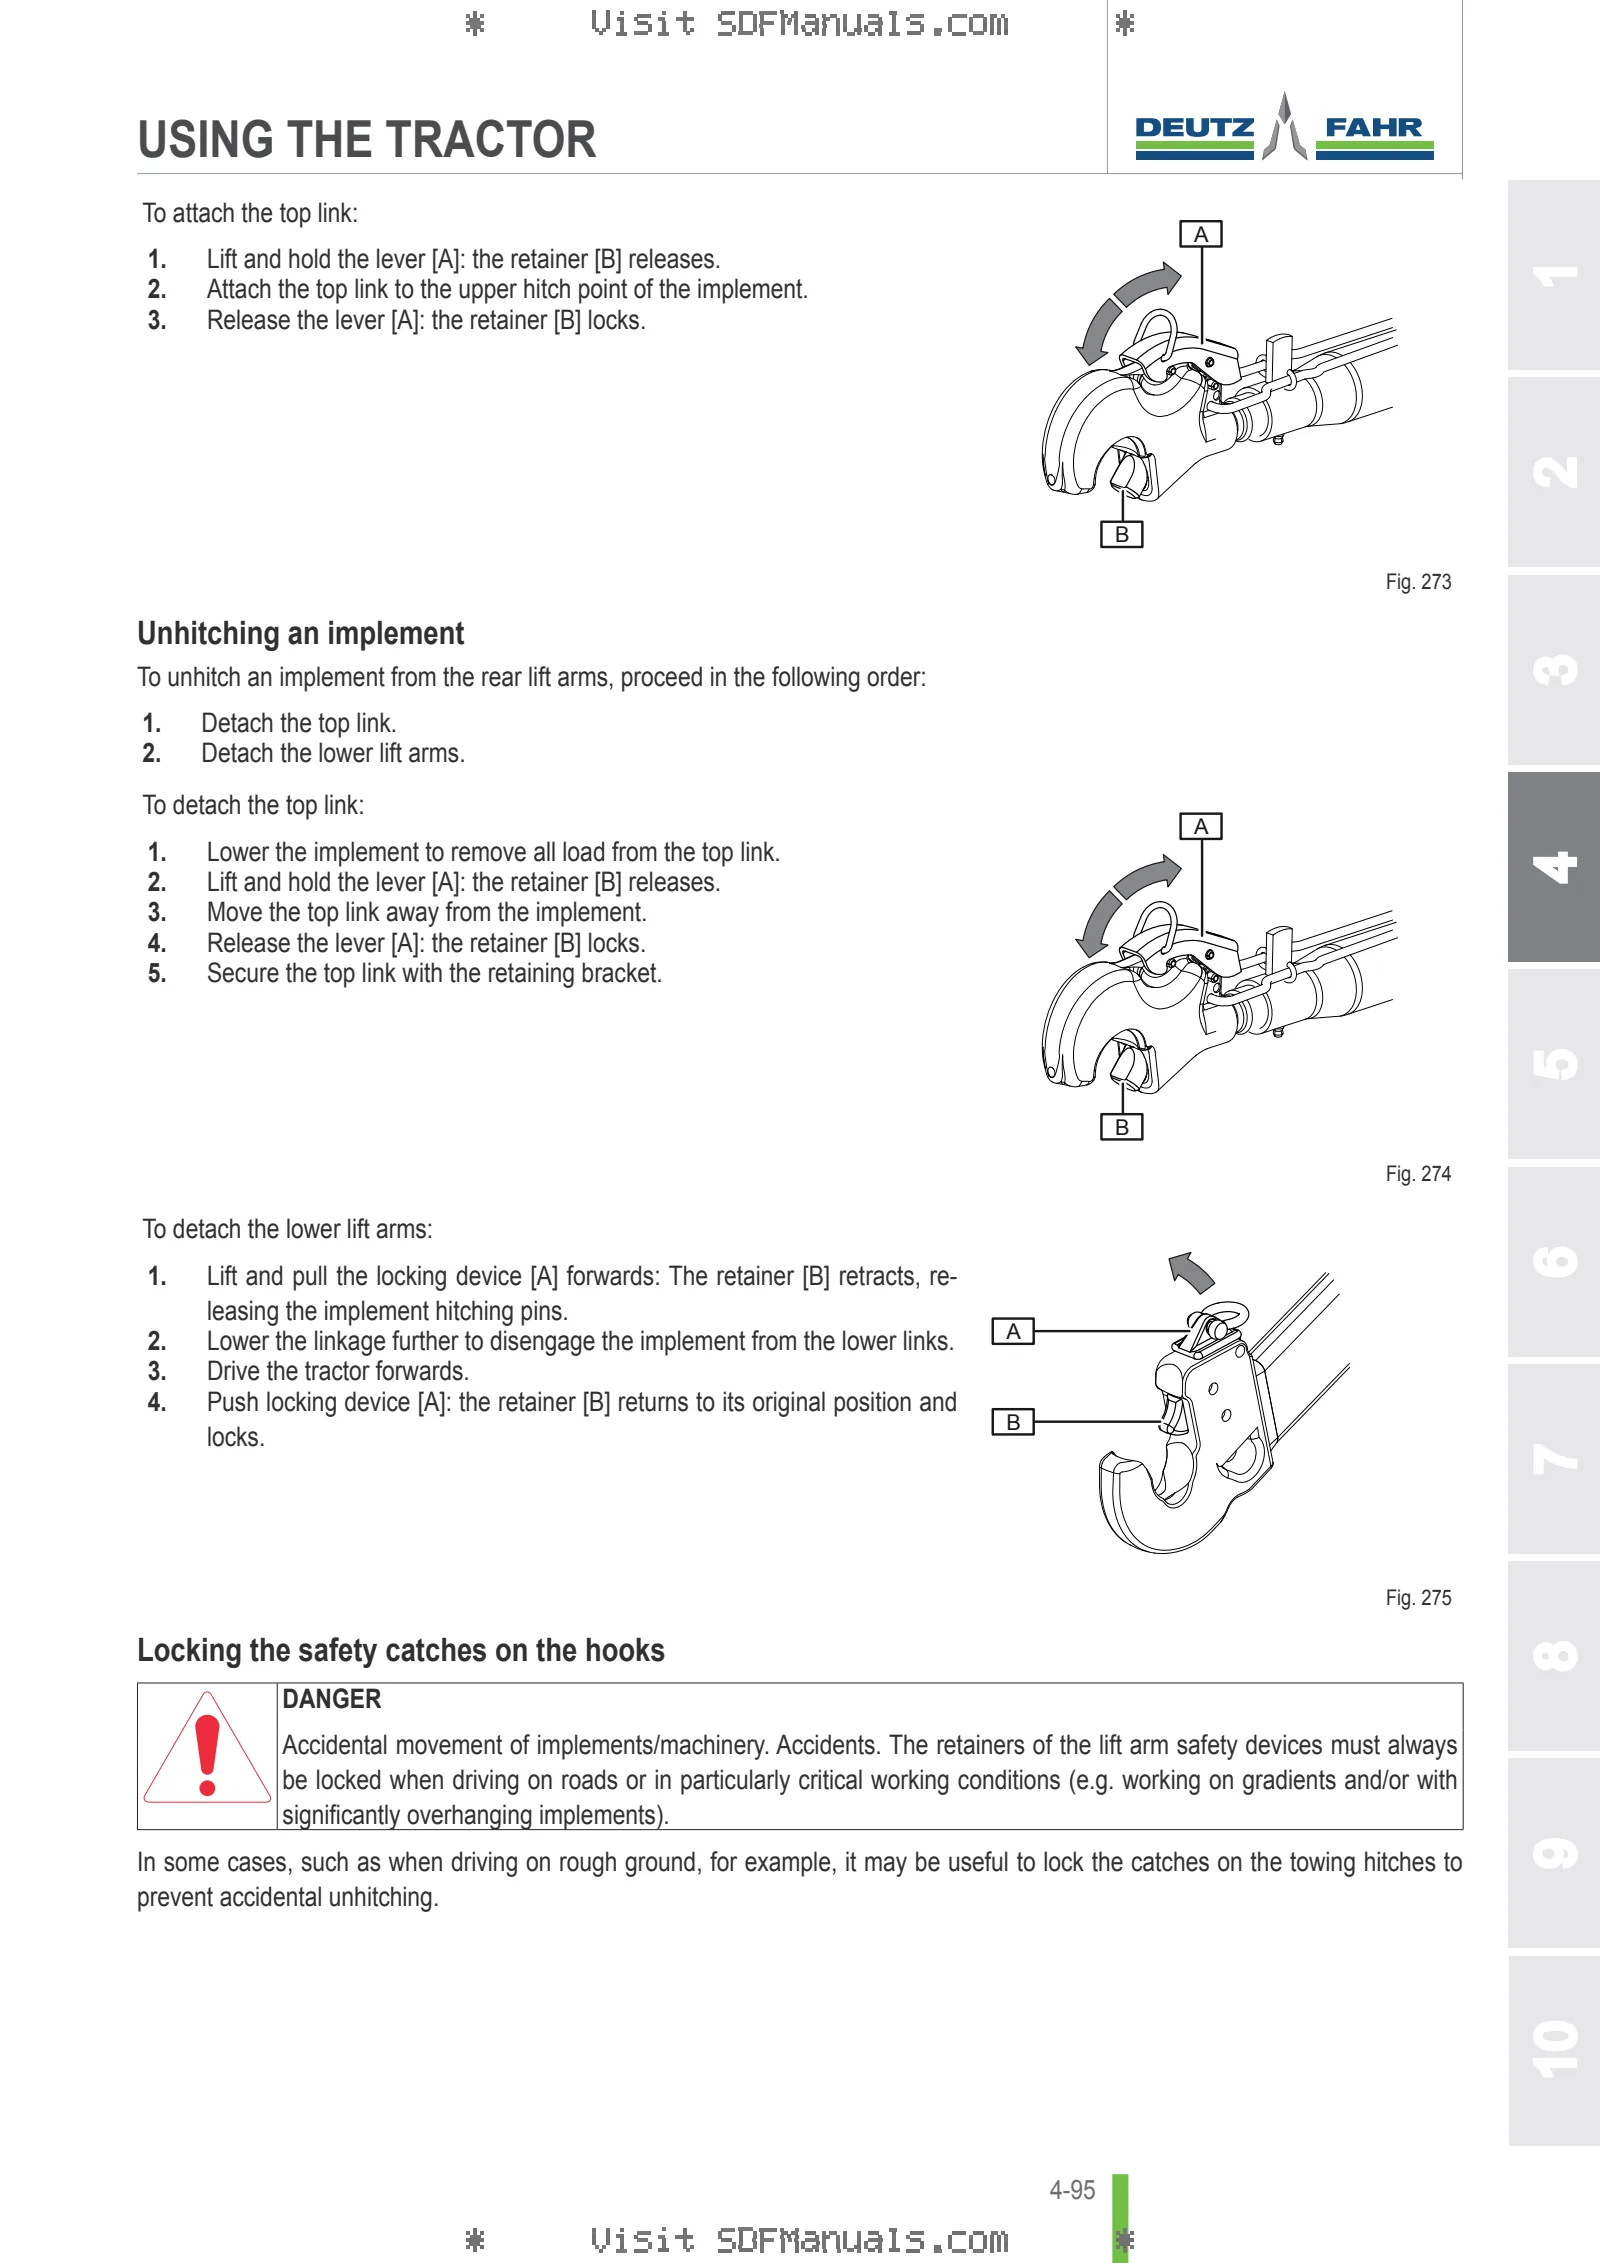
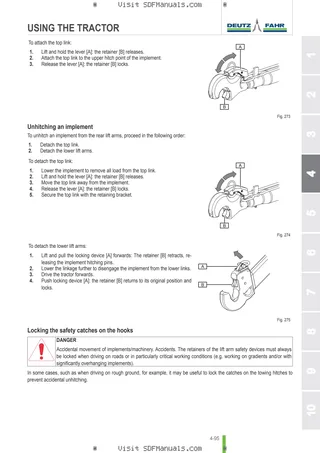
- Hitching and unhitching implements to/from the 3-point linkage
Hydraulic system
- Hydraulic distributor configurations
- Remote valve operating modes
- Hydraulic distributor controls and indicator lamps
- Connecting/disconnecting implements to/from hydraulic distributors
- Operating the hydraulic distributors
- Example of operating a reversible plough
- Example of operating a hydraulic motor
- Example operation of tipping trailer
Towing
- Towing devices
- Trailer towing eye-towing hitch compatibility
- Technical characteristics of towing hitches
- Hydraulic trailer braking
- Pneumatic trailer brake
- Connecting the electrical system of the trailer
Towing devices
- Drawbar
- Hitch support frame
- Adjusting the height of the towing hitches
- Towing hitch with safety lock
- Towing hitch with lock pin
- Automatic towing device
- Semi-automatic towing hitch
- Piton Fix or ball towing hitch frame
- Mechanical Pick-up Hitch
- Hydraulic Pick-up Hitch
Monitoring and programming
- Instrument panel parameters
WHEELS
Tyres
- Basic information concerning tyres
- Punctures and changing tyres
- Wheel nut/screw tightening torques
- Steering angle adjustment
- Adjusting steering angle for axles with four limit screws
- Adjusting steering angle for axles with two limit screws
- Front/rear tyre combinations
- Inflation pressures, load index and speed rating of tyres
- Load capacities of radial tyres and speed ratings
- Load capacities of conventional/cross-ply tyres and speed ratings
Adjustments
- Calculating the mechanical lead
- Axle width
- Adjust the track widths (fixed rim wheels)
- Adjust the track widths (variable track wheels)
- Adjusting track widths (Waffle variable track wheels)
- Adjusting track widths (2WD tractors with variable track wheels)
- Adjustable front mudguards
- Fixed front fenders
BALLASTING
Stability
- Weighing the tractor
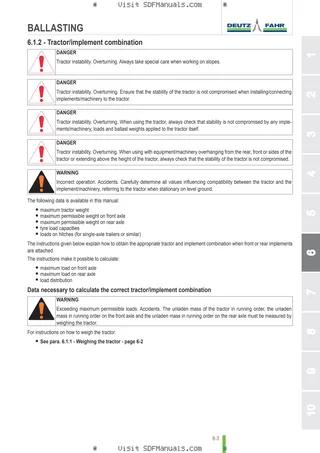
- Tractor/implement combination
Ballasting
- Ballasts
- Ballast mount
- Intermediate plate
- Suitcase ballast weights
- Monolithic block
- Metal discs for wheels
- Liquid ballast for tyres
ELECTRICAL SYSTEM
- Introduction to the electrical system
Battery
- Battery
Fuses
- Fuses and relays
- Fuses and relays on right hand side, near battery
Lights
- Replacing the bulbs in the road lights
- Adjust the headlights for road travel
- Replace the bulbs in the work lights
- Changing the interior courtesy light bulbs
Other equipment
- Power sockets
- Installation of electronic components and/or equipment
MAINTENANCE OPERATIONS
Maintenance warnings
- Safe maintenance
Washing the tractor and implements
- Warnings
- Hazards and protective devices
- Required equipment
- Starting conditions
- Washing the exterior of the tractor
- Washing the interior of the cab
Accessing the engine compartment
- Warnings
- Hazards and protective devices
- Starting conditions
- Overview of procedures
- Open and close the cowl
- Remove and refit the side panels
Tool box
- Pull out the tool box
Storing the tractor
- Overview of procedures
- Operations prior to a prolonged period with the tractor not in use
- Operations after a prolonged period with the tractor not in use
Decommissioning and disposal of the tractor
- Decommissioning the tractor
- Scrapping the tractor
Fluids and lubricants
- Fluids – Lubricants and fill volumes
- Coolant
Intervals
- Maintenance service
- Maintenance table – 1st Service
- Maintenance table
- Additional maintenance procedures – North America Version
Tractor
- General inspection of tractor
- Lubrication and greasing
- Contact an authorised service centre
Engine
- Check and top up the engine oil level
- Change the engine oil
- Changing the engine oil filter
- Check and top up the coolant level
- Changing the engine coolant
- Cleaning the radiators
Engine accessories
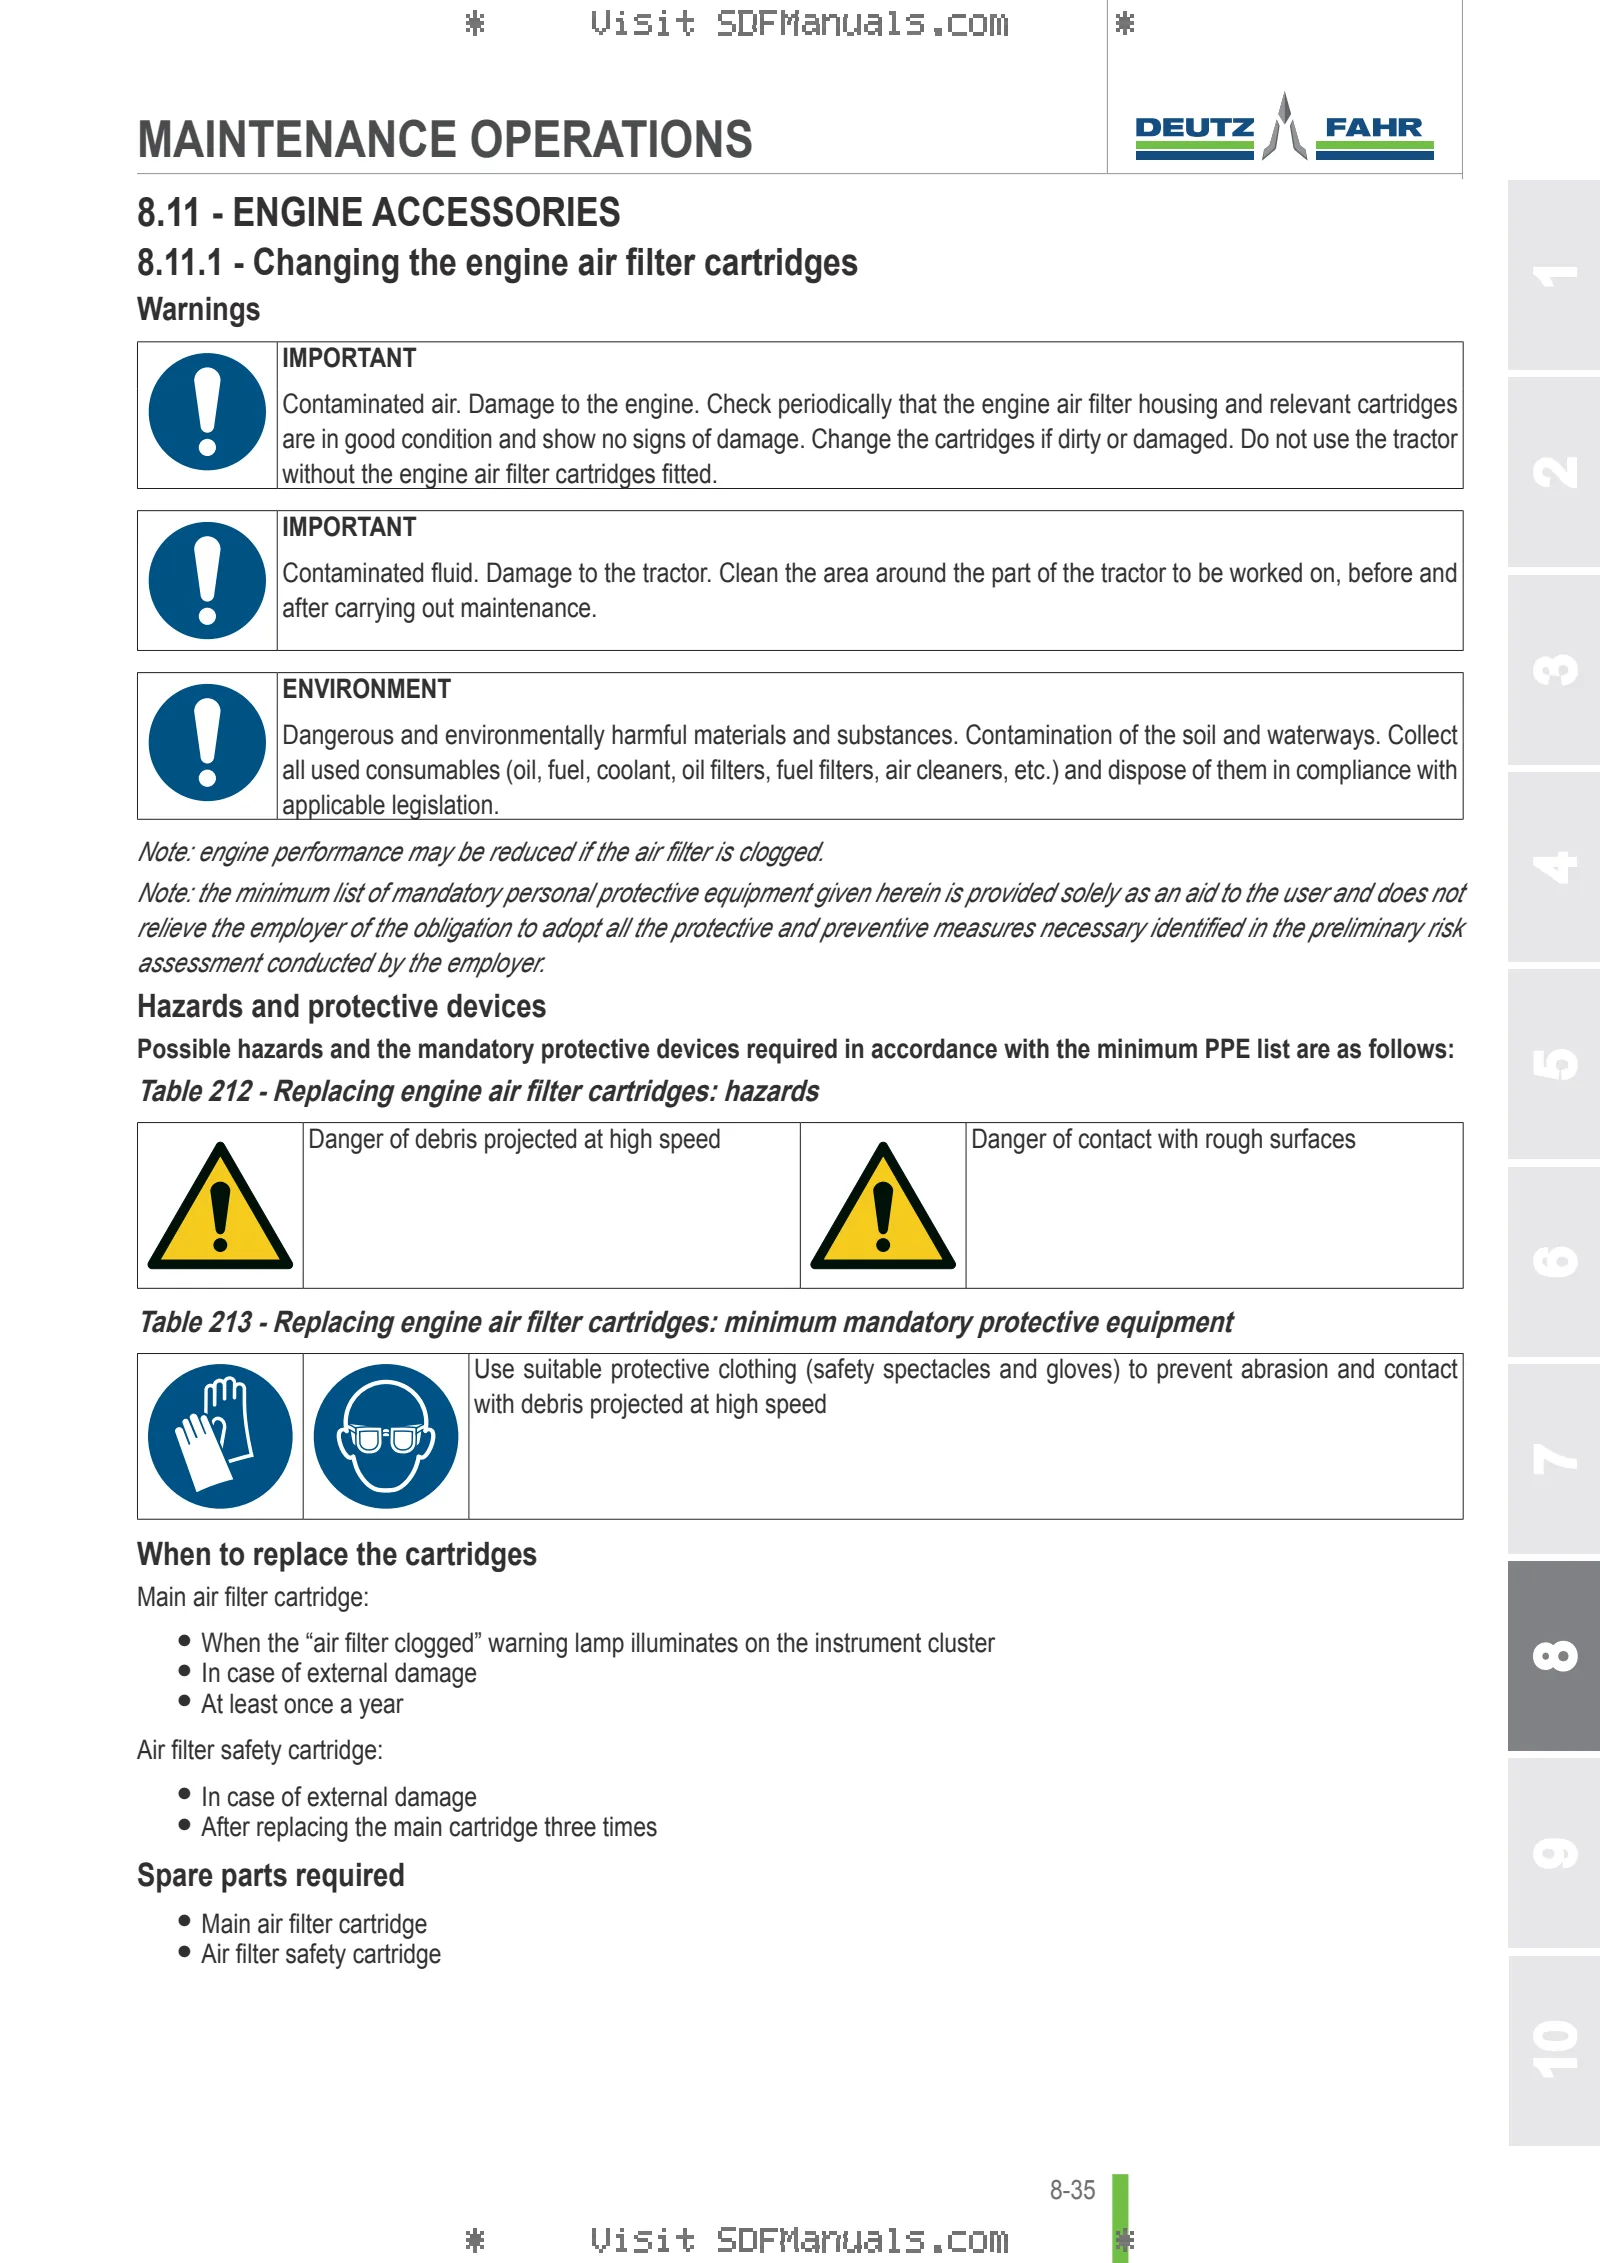
- Changing the engine air filter cartridges
- Draining water and sediment from the fuel filter and prefilter
- Replacing the fuel filter
- Replacing the fuel prefilter
- Replacing the AdBlue® pump filter
- Bleed air from the fuel circuit
Transmission
- Checking and topping up the transmission oil
- Replace the transmission oil and filter
Front axle
- Checking and topping-up the front axle oil level
- Change the front wheel hub oil (2WD)
- Changing the oil in the front axle and final drives (4WD)
- Check the state of wear of the gaiters of the steering system
Cab
- Check the liquid detergent level
- Clean and replace the cab internal air filter
- Clean and replace the external cab air filters
- Clean the heating system matrix
Hydraulic and pneumatic system
- Drain the water from the air braking system
- Checking the oil lines
- Bleed air from the braking hydraulic system
- Check and top up the brake oil level
- Check the brake pedals
Electrical system
- Check and top up the battery electrolyte level
Wheels
- Checking wheels and tyres
Ballast and hitches
- Maintenance of towing devices
- Check the ballast weights
TROUBLESHOOTING OF FAULTS AND EMERGENCIES
Fault diagnosis
- Alarm display
- Introduction to troubleshooting
- Troubleshooting for entire tractor
- Engine troubleshooting
- Transmission troubleshooting
- PTO troubleshooting
- Lift troubleshooting
- Brakes troubleshooting
- Hydraulic system troubleshooting
- Distributor troubleshooting
- Cab troubleshooting
- Electrical system troubleshooting
Emergencies
- Emergency types
- Emergency starting
- Emergency control of rear lift
- Towing the tractor in the event of a breakdown
- Front emergency tow device
- Transporting a disabled vehicle
- Lift the tractor
- Tractor lifting points
FRONT LOADER
Introduction
- Introduction
Safety pictograms
- Safety pictograms
Getting to know the controls
- Front loader controls
Using the controls
- Using the front loader
Maintenance
- Maintenance of the front loader
Technical data
- Technical data of loader
TECHNICAL DATA
Main technical data
- Introduction
- Tractor technical data
- Operator cab technical data
- Noise technical data
- Vibrations technical data
- Power delivered by the front PTO
- Power delivered by the rear PTO
- Maximum towable mass
Ballast technical data
- Available ballasts
- Dimensions and weights of the tractor
Tractor speed (5110 G -> ZKDDE60200TD10001)
- Tractor speed
- Conversion table
Tractor speed (5120 G -> ZKDDE70200TD10001)
- Tractor speed
- Conversion table
Implement coupling diagrams (5110 G -> ZKDDE60200TD10001)
- Technical considerations for attaching implements to tractor
- Implement attachment holes
Implement coupling diagrams (5120 G -> ZKDDE70200TD10001)
- Technical considerations for attaching implements to tractor
- Implement attachment holes