
Document overview
Workshop Manual PDF for SAME IRON³ 190 DCR → ZKDS7802W0LS10010, IRON³ (STAGE 3A) family. Document language: English; 1,059 pages.
The corresponding English table of contents contains 52 sections and 286 individual topics.
Main sections included
- Introduction
- Safety
- Technical characteristics
- Calibrations and electronic diagnosis
- Method of intervention
- Wiring diagrams
- Service Info
Document details
- Brand: SAME
- Family: IRON³ (STAGE 3A)
- Model: IRON³ 190 DCR
- Starting serial number: ZKDS7802W0LS10010
- Document type: Workshop Manual
- Language: English
- Pages: 1,059
- File size: 273.24 MiB
- Format: Digital PDF download
Compatibility
Before purchasing, verify that your machine model and reference code match SAME IRON³ 190 DCR → ZKDS7802W0LS10010.
Complete table of contents
Introduction
- Units of measurement and conversion factors
- Tightening torques
Safety
Preface
- Important notes concerning safety
Important safety information
- Recognising hazards
- Indications for persons in contact with the tractor
Safety rules
- Risks during tractor preparation
- Risks during maintenance
- Work on machine systems
- Special disassembly/assembly/inspection procedures
Safety pictograms
- Replacing safety pictograms
Environmental risks
- Hazards associated with the operating environment
Technical characteristics
Engine
- Engine 2013 components
- Technical data
Transmission
- Hydraulic reverse power shuttle
- POWER SHIFT Transmission
- H-M-L unit
- Intermediate gearbox
- Rear gearbox
- Rear PTO
Rear axle
- Rear axle
Front axle
- Front axle
- Differential
Bodywork – Cab – Platform
- Air conditioning system
Hydraulic system
- STEERING – TRANSMISSION hydraulic circuit
- REMOTE VALVES – LIFT hydraulic circuit
- Variable displacement pump
- Power steering valve
- Hydraulic front axle suspension
- Remote control valve
- Braking system
- Trailer braking valve (ITALY version)
- Trailer braking valve (EXPORT version)
- POWER SHIFT valves block
Front lift
- Front lift
Rear lift
- Rear lift
Calibrations and electronic diagnosis
Diagnostic tools
- Positions of ECUs and diagnostic instruments
SDF Analyser
- SDF Analyser
- SDF Analyser – Diagnostic socket
- SDF Analyser – Armrest connection
Serdia 2000
- Serdia
- SERDIA 2000 level III” software
- SERDIA – Diagnostic socket connection
Diagnostic tool screens
- ECU interrogation
Commissioning and calibrating the tractor
- Tractor commissioning – table of contents
- Scope of the document
- Instruments and information required
- Putting the transmission ECU into service – Introduction
- Putting the transmission ECU into service – EEPROM reset
- Putting the transmission ECU into service – Calibration of the clutch pedal
- Putting the transmission ECU into service – Calibration of the tilt sensor
- Putting the transmission ECU into service – Calibration of the range sensor
- Putting the transmission ECU into service – Automatic calibration of the gearbox clutches
- Putting the transmission ECU into service – Automatic calibration of the shuttle clutches
- Putting the transmission ECU into service – Manual calibration of the shuttle clutches
- Transmission ECU commissioning – Manual calibration of the shuttle clutches
- Putting the armrest ECU into service – EEPROM reset
- Putting the armrest ECU into service – Configurations
- Putting the services ECU into service – EEPROM reset
- Putting the services ECU into service – Lift calibration
- Putting the services ECU into service – Calibration of the ASM (SBA) system
- Putting the services ECU into service – Configuration of the front/rear PTO
- Commissioning service ECU – Front Suspension Configuration
- Putting the services ECU into service – Configuration of the electro-hydraulic control valves
- Putting the EPB control unit into service – Initialisation
- Workshop Procedure for EPB Calibration
ECU alarms
- Key to the “ECU alarms” tables
- FMI code
Engine alarms
- Engine ECU alarms – ART codes
- Engine ECU alarms – Serdia codes
Transmission alarms
- Transmission HLHP alarms
HLHP alarms
- Services HLHP alarms
EPB Alarms
- E.P.B. alarms
Software management
- Transmission firmware update
- Engine dataset upgrade
Method of intervention
- Commercially available tools
- Special tools
B0 – Engine
- Test data and settings
- Tightening torque
- Compression test
- Assembly and disassembly of the engine on the assembly stand
- Valve clearance adjustment (with the exhaust gas recirculation module absent or removed).
- Valve clearance adjustment (with the exhaust gas recirculation module installed).
- Removal and refitting of the rocker arms and pedestals
- Disassemble and complete the rocker and support, check
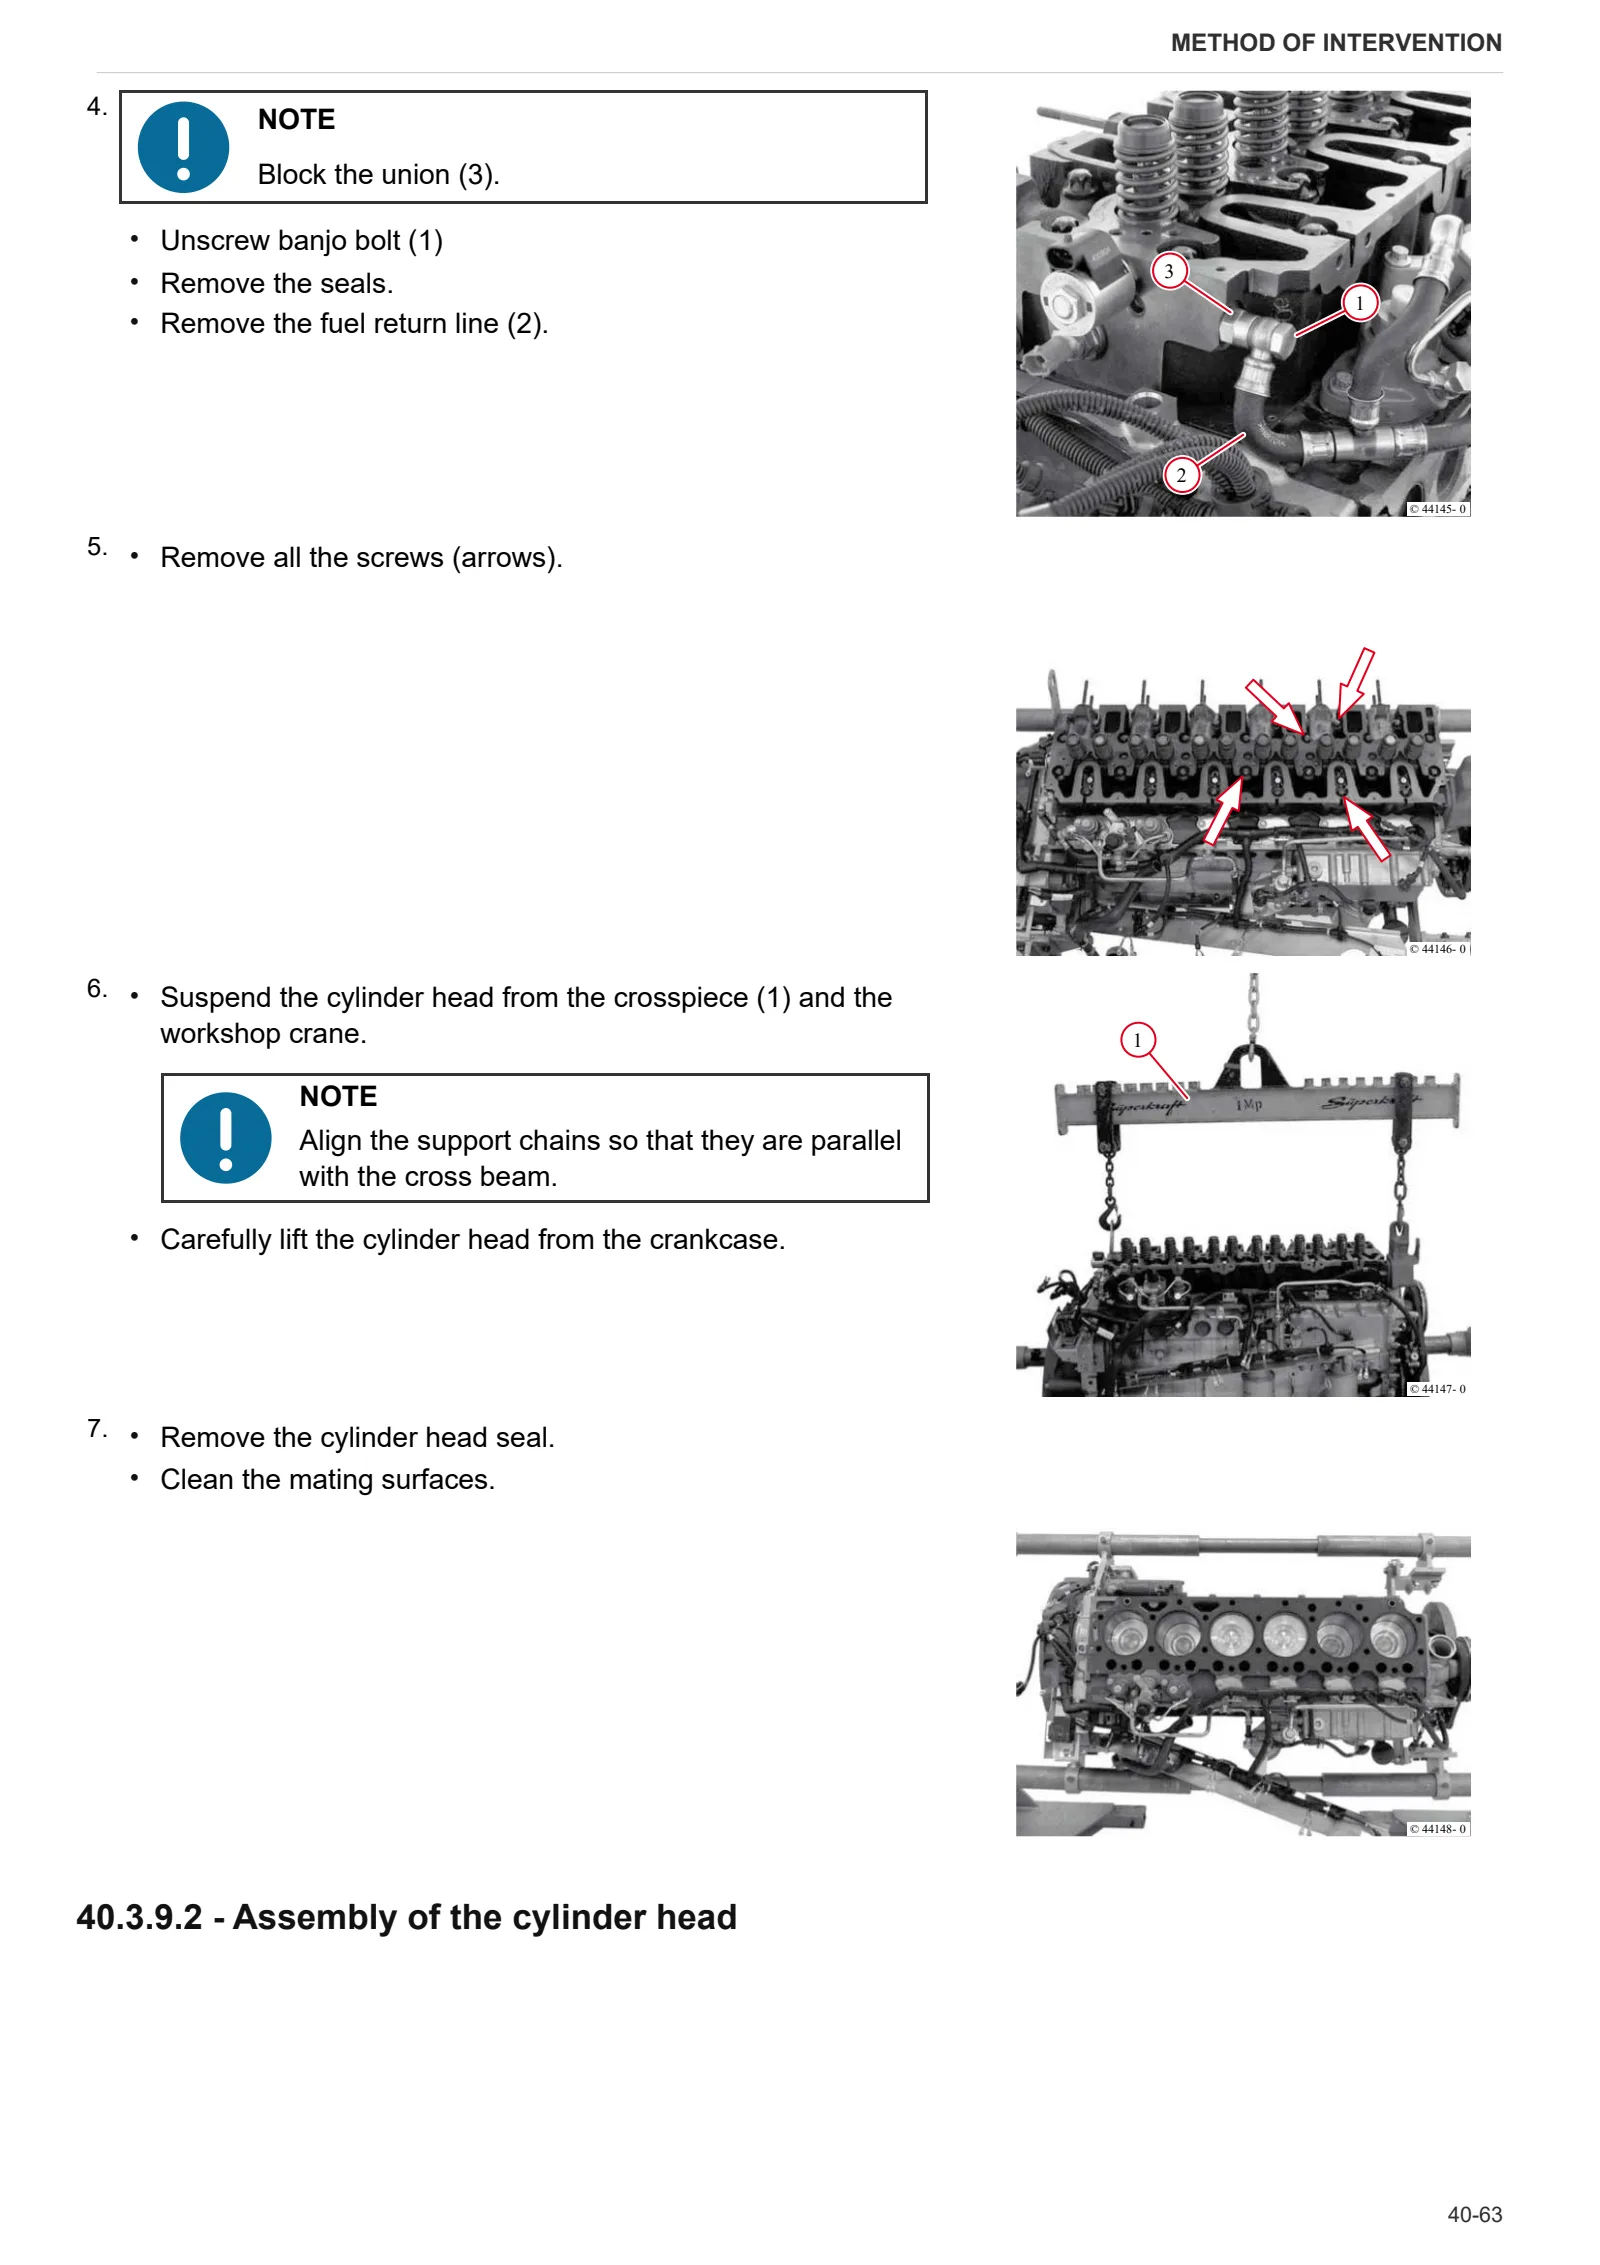
- Disassembly and assembly of the cylinder head
- Valve assembly and disassembly
- Valve check
- Check the valve guide
- Check the valve residual
- Check the endfloat of the crankshaft
- Check the crankshaft
- Replace the crankshaft O-ring (flywheel end)
- Replacing the crankshaft O-ring (opposite end to flywheel)
- Check the connecting rod drum
- Assembly and disassembly of the crankshaft
- Disassembly and assembly of the piston and connecting rod drum
- Check the piston
- Check the piston rings and piston grooves
- Assembly and disassembly of piston cooling nozzles
- Removal and refitting of the crankcase breather
- Cylinder liner check
- Fitting and removing the cylinder sleeve
- Check the protrusion of the cylinder liner
- Removal and refitting of the front cover (opposite end to flywheel)
- Disassembly and assembly of the connector box
- Disassembly and assembly of the gear case cover
- Assembly and disassembly of the camshaft
- Check the camshaft
- Removal and refitting of the turbocharger
- Removal and refitting of the charge air duct
- Fitting and removing the exhaust gas recirculation module
- Removing and fitting the fuel pump (driven by toothed belt)
- Removal and refitting of the fuel control unit
- Removal and refitting of the high-pressure pump (installation position A)
- Removal and refitting of the high-pressure pump (installation position B)
- Removal and refitting of the common rail
- Removal and refitting of the injectors
- Removal and refitting of the pressure cut-off valve
- Removal and refitting of the fuel pressure sensor
- Disassembly and assembly of the gear case cover
- Removal and refitting of the oil sump pan.
- Removal and refitting of the oil cooler
- Disassembly and assembly of the oil radiator housing
- Removal and refitting of the oil pressure switch
- Fitting and removing the fuel pressure regulator valve
- Removing and fitting the coolant pump (driven by toothed belt)
- Testing the thermostat (after removal)
- Removal and refitting of the thermostat
- Fitting and removing the thermostat housing
- Removing and refitting the torsional vibration damper (toothed belt drive)
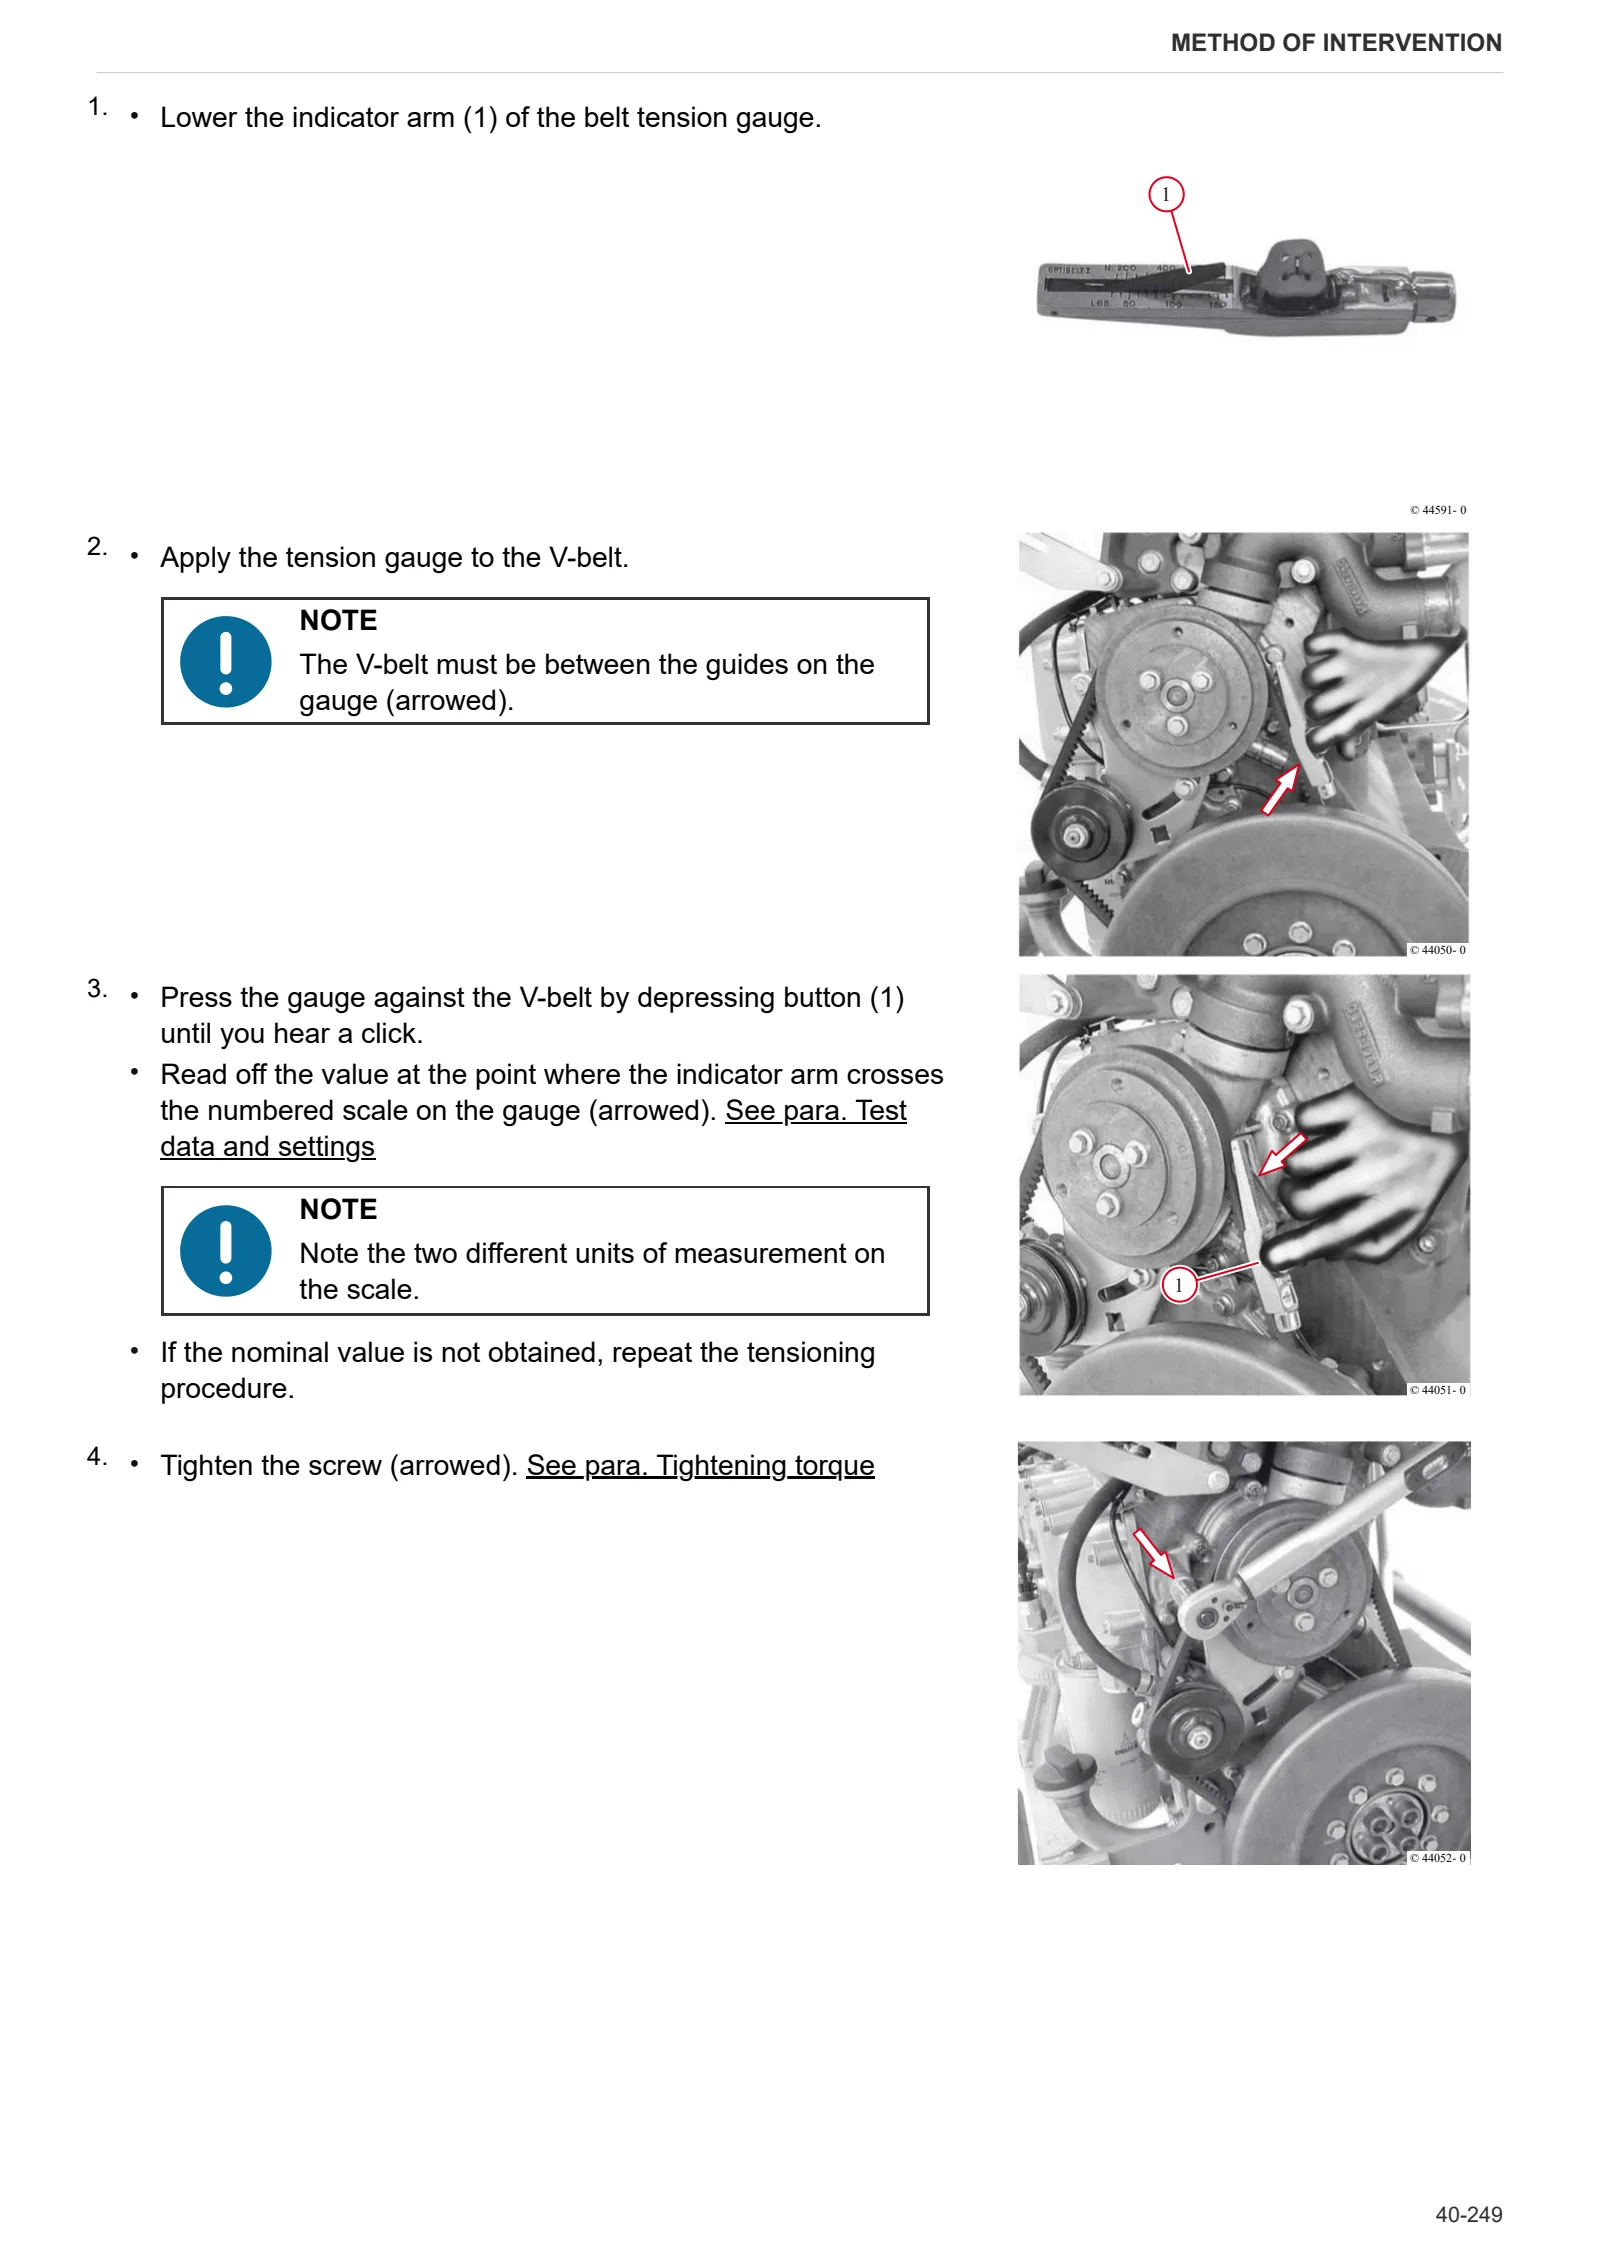
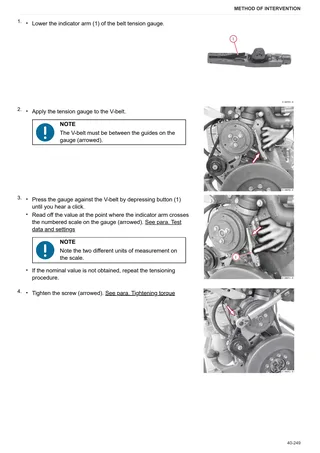
- Removing and fitting the V-belt, V-belt pulley
- Removal and refitting of the flywheel
C0 – Engine accessories
- Disassembly and assembly of the speed indicator (crankshaft)
- Removal and refitting of the camshaft speed sensor
- Removal and refitting of the exhaust manifold
- Fitting and removing the solenoid valve (exhaust gas recovery module)
- Removal and refitting of the fuel filter head.
- Removal and refitting of the rail pressure sensor
- Assembly and disassembly of the temperature sender
- Removal and refitting of the engine wiring loom
- Removal and refitting of the alternator (with drivebelt)
- Disassembly and assembly of the starter
- Removal and refitting of the supply air pressure/temperature sender
D0 – Transmission
- Complete hydraulic shuttle assembly
- Shuttle and HML assembly
- Changing the transmission oil
- Clutch control assembly
- Disassembly of the clutch control assembly
- H clutch assembly
- Disassembly of the H clutch assembly
- Slow-medium gear clutch pack
- Slow/medium epicyclic gear unit
- Powershift control valve
- Disassembly of powershift control valve
- Secondary shaft
- Primary shaft
- Rear PTO drive shaft and pumps assembly
- Front gearbox
- View of front gearbox from rear
- Rear gearbox removal
- Front gearbox cover
- Range gear control cover
- Lower gearbox cover
- Range reduction unit control unit
- Disassembly of the range reduction unit control assembly
- Range gear and creeper selector assembly
- Adjusting the bearings preload
- Range driving gear
- Disassembly of the range driving gear
- Range driving gear
- Creeper planetary reduction unit
- Disassembly of the creeper planetary gear unit
- PTO clutch
- PTO output shaft
- PTO output shaft
- 4WD shaft and clutch
E0 – Rear axle
- Rear axle
- Disassembly of the rear axle
- Adjustment of rear half-shaft bearings
- Brake housing
- Disassembly of the planet carrier
- Rear differential
- Disassembly of the rear differential
- Rear axle brake assembly and brake discs
- Disassembly of the rear axle brake assembly
- Brake actuator
- Rear brakes
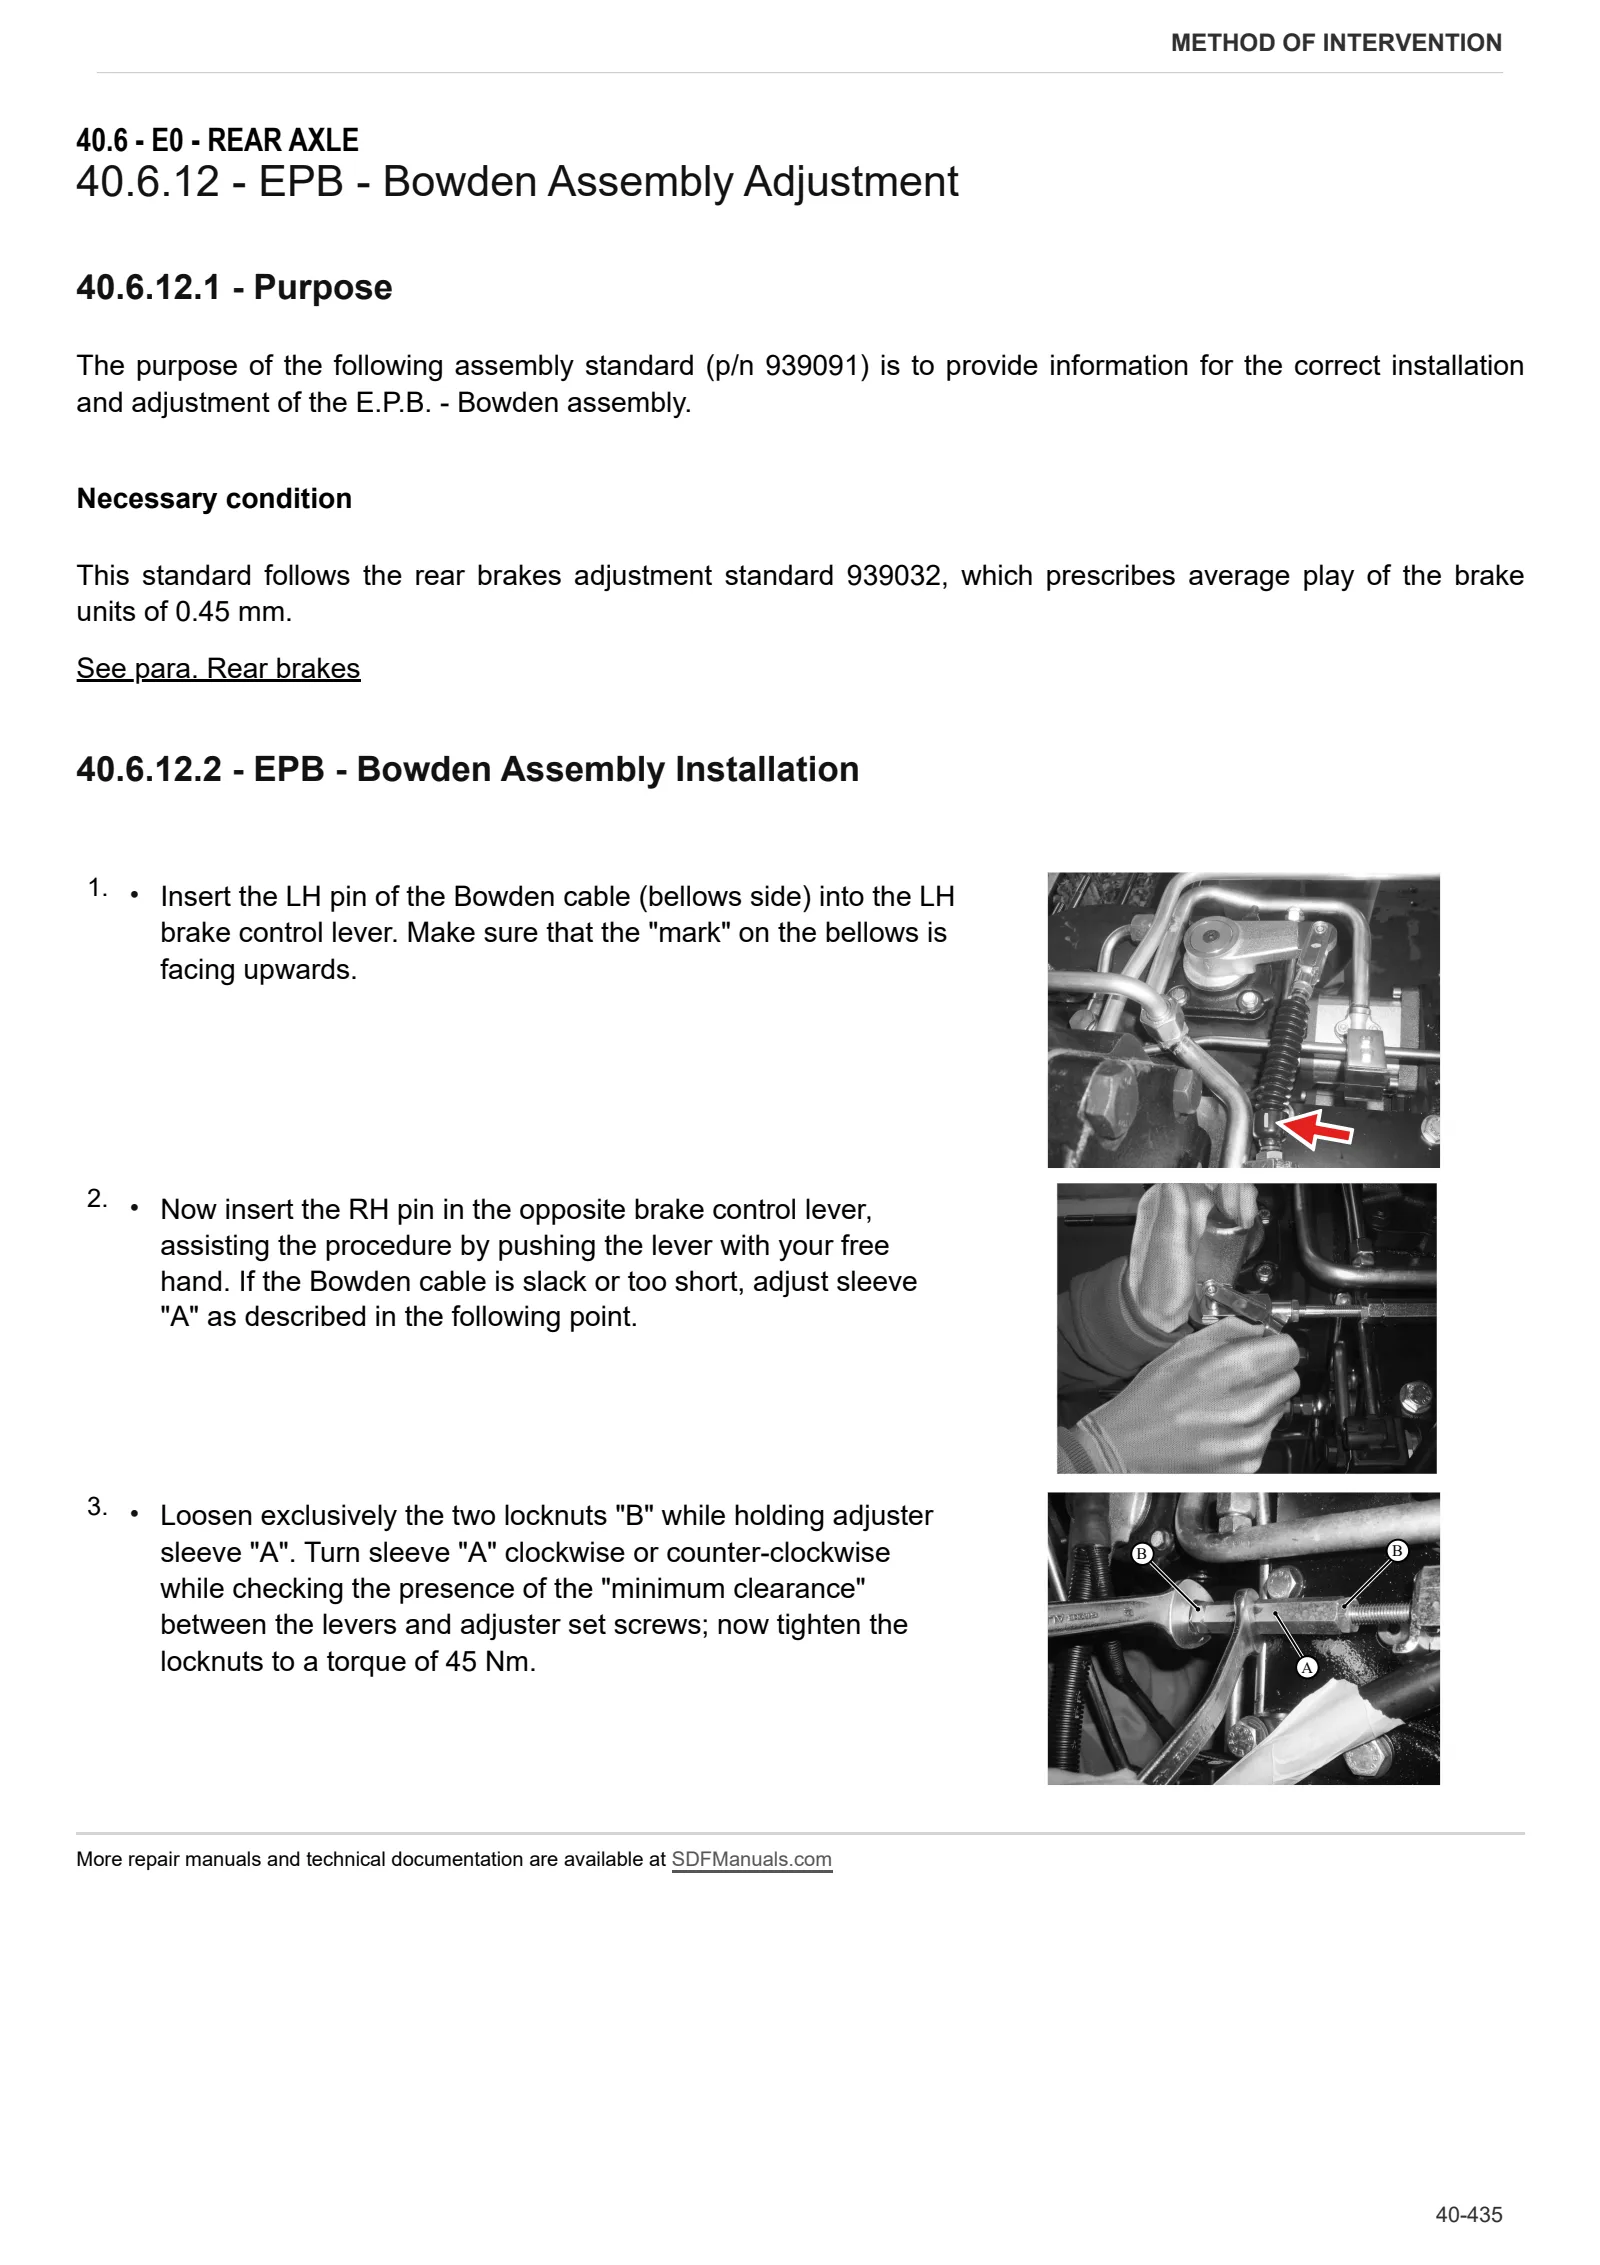
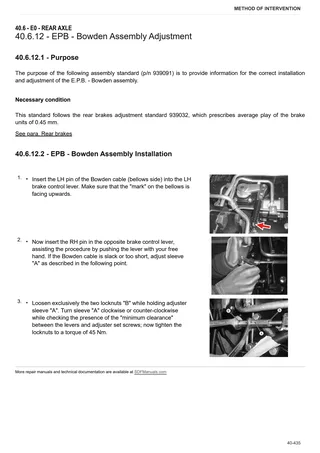
- EPB – Bowden Assembly Adjustment
F0 – Front axle
- Adjustment of pinion and crown wheel backlash
G0 – Bodywork – Cab – Platform
- Electronic park brake mechanism
H0 – Hydraulic system
- Complete pumps assembly
- Priority valve
- Brakes lubrication pump
- Powershift steering pump
- Transfer pump
- LS pump
L0 – Electrical system
- Range gearbox output speed sensor
V1 – AFTERMARKET KITS
- Installing heat shields
- Coolant radiator
Wiring diagrams
Introduction
- Introduction
- Basic electronics for mechanics (1/2)
- Basic electronics for mechanics (2/2)
- Electrical and electronic components (1/2)
- Electrical and electronic components (2/2)
Components
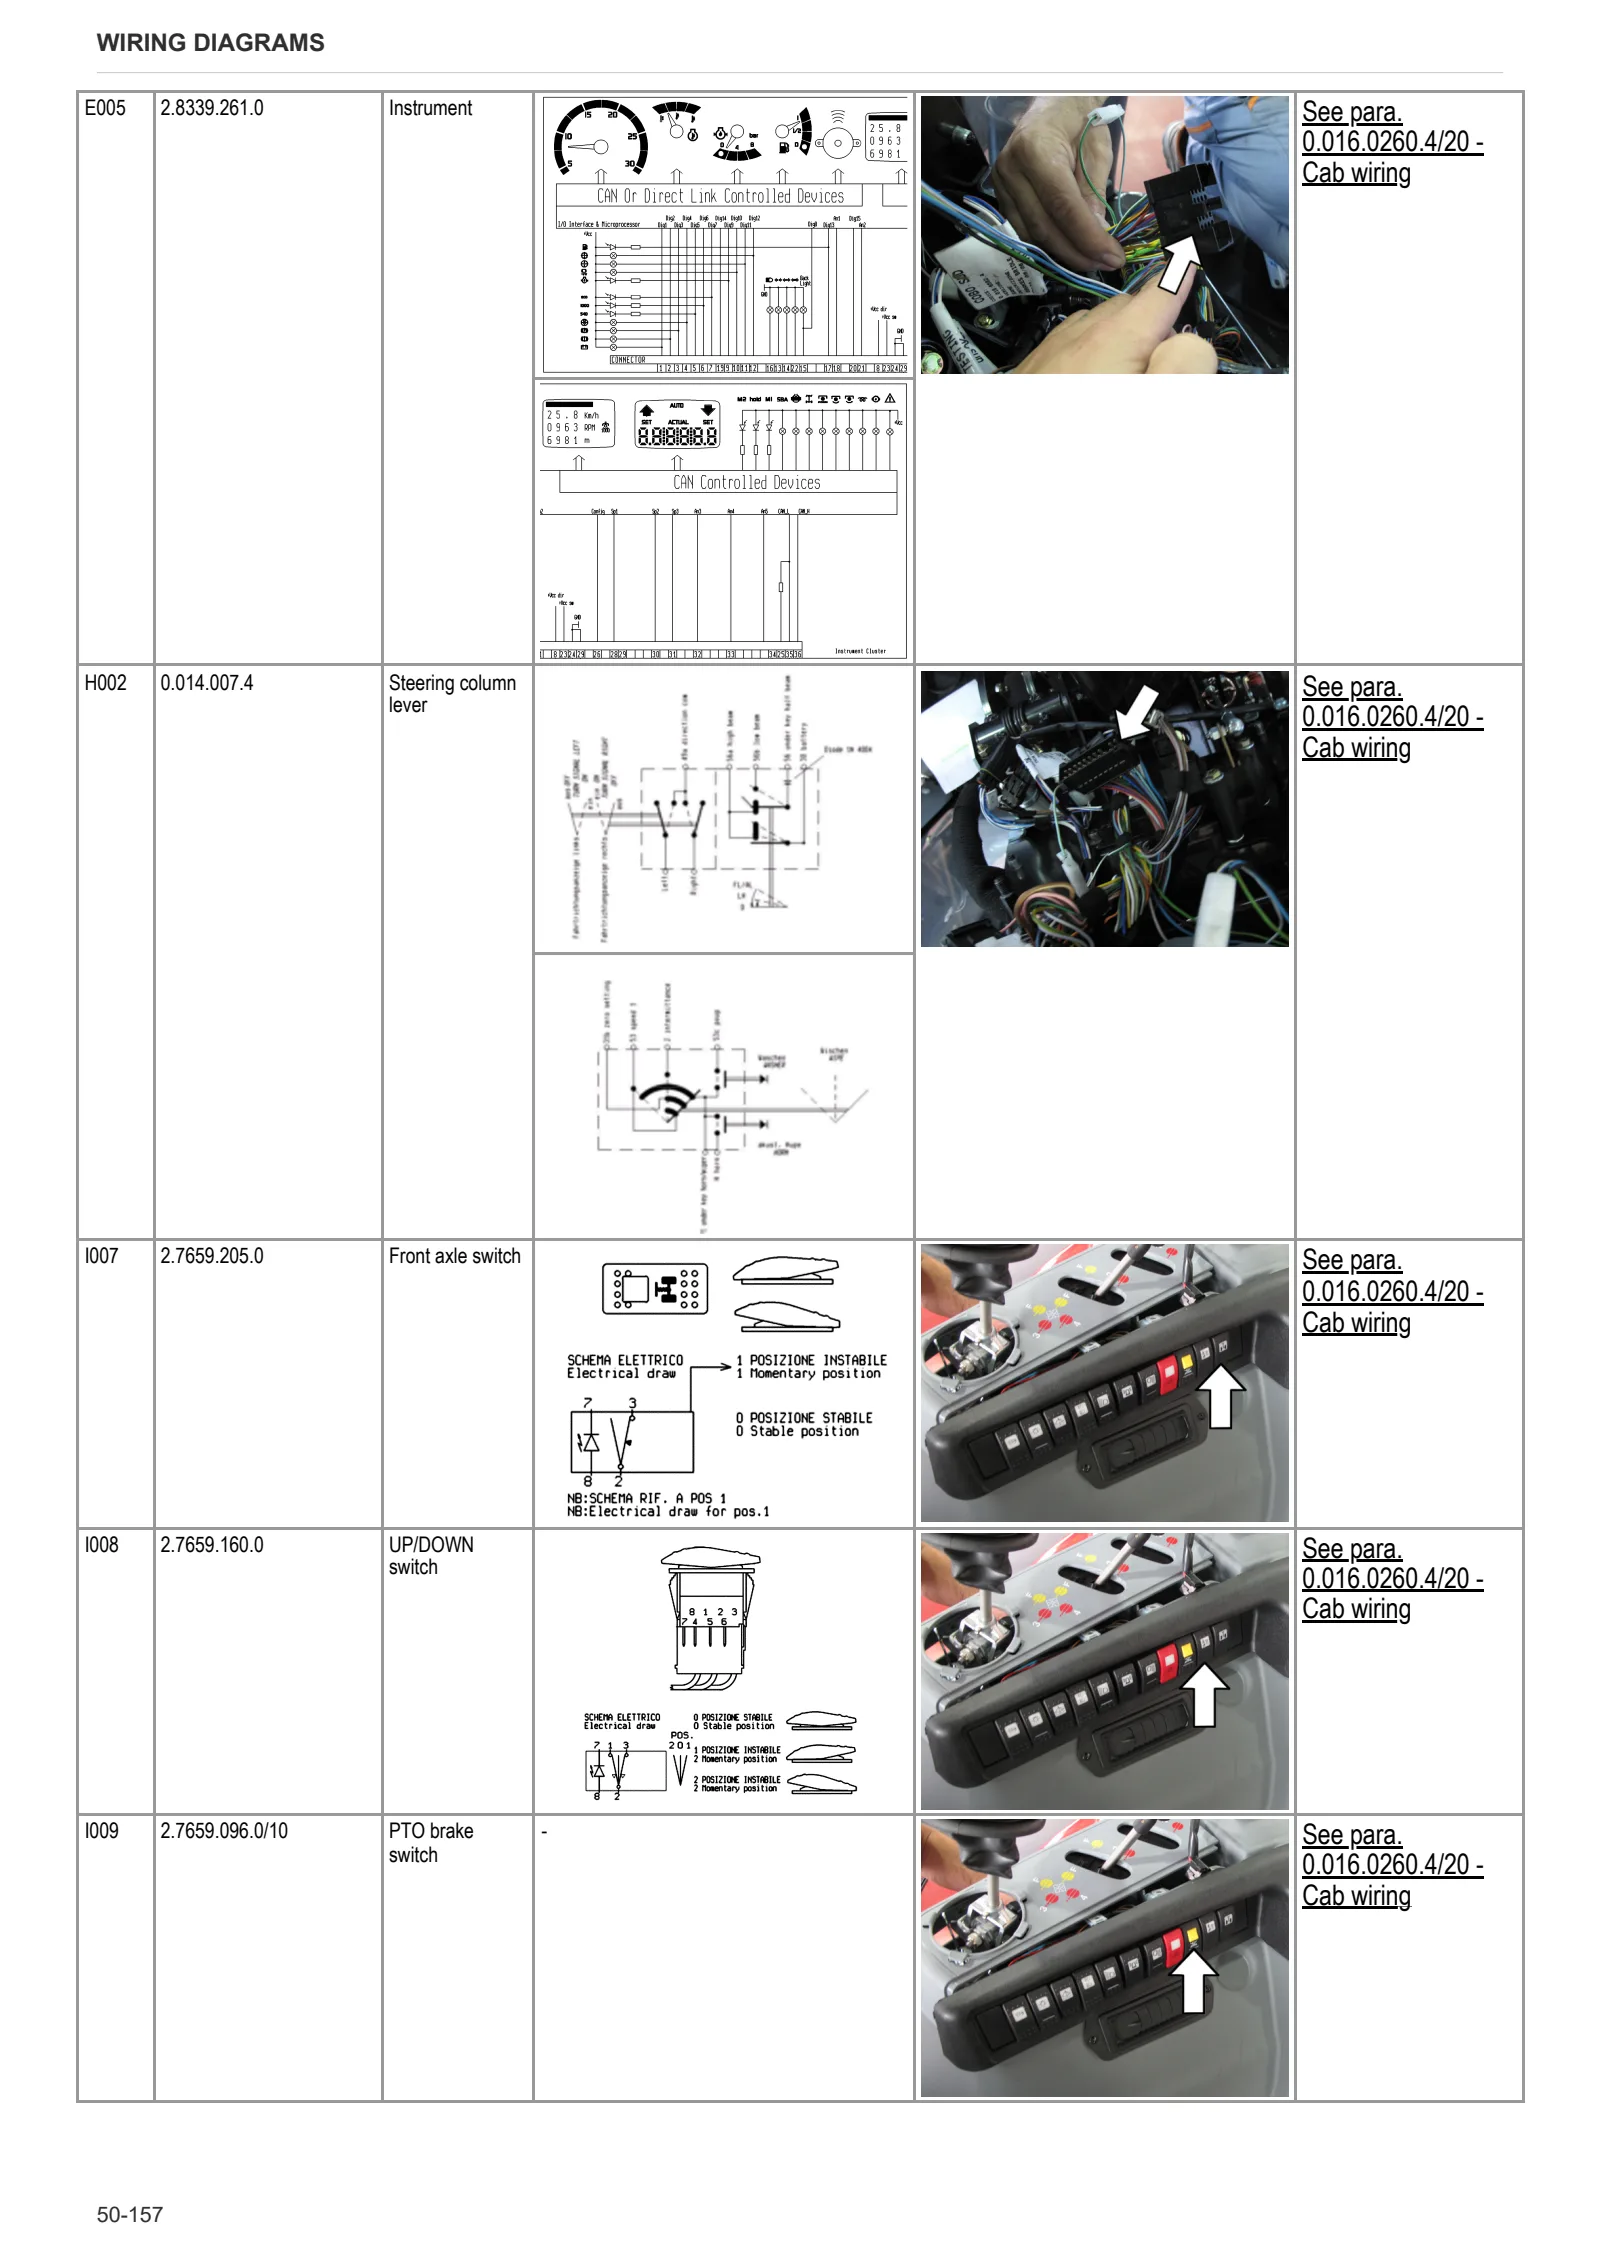
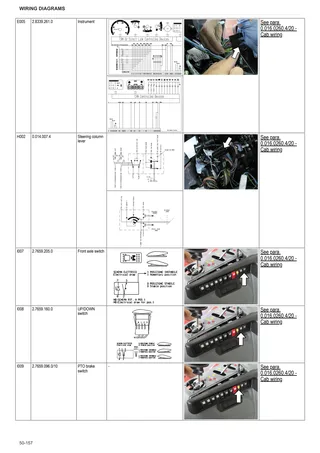
- Components list
Systems
- S001 – Engine ECU
- S002 – Armrest
- S003 – Transmission ECU
- S004 – Services ECU
- S005 – Instrument panel (w/ hydraulic braking)
- S005 – Instrument panel (w/ air braking)
- S006 – Cab 1
- S007 – Cab 2
- S008 – Cab roof 1
- S009 – Cab roof 2
- S010 – Air conditioning
- S011 – Relay
- S012 – Positives
- S013 – Negatives 1
- S014 – Negatives 2
- S015 – Negatives 3
- S016 – Negatives 4
- S017 – CAN BUS
- S018 – Cold climates
Wiring harnesses
- 0.008.0913.3 – Front PTO wiring
- 0.010.8707.4/10 – SBA sensor lead
- 0.010.8711.4/30 – Rear lights wiring
- 0.011.3824.4/10 – Rotating beacon wiring
- 0.011.6007.3 – Water reservoir electric lead
- 0.013.4463.4 – Front axle suspension wiring
- 0.014.1645.4/10 – Hydraulic trailer braking wiring – Italy
- 0.015.2536.4 – Engine interface wiring
- 0.016.7898.4 – Front lights wiring
- 0.016.0260.4/20 – Cab wiring
- 0.016.0261.4/20 – Front wiring
- 0.016.0262.4/10 – LH rear wiring
- 0.016.0263.4/10 – RH rear wiring
- 0.016.0264.4/10 – Battery leads
- 0.016.1001.4/20 – Trailer air braking solenoid valve wiring
- 0.016.1203.4/20 – Fuse box
- 0.016.1575.4/10 – Cab roof wiring
- 0.016.6592.4 – Brake wiring
- 0.016.8489.4 – Trailer air braking solenoid valve wiring
- 0.900.0783.8 – Air conditioning wiring
- 0421.4895 – Engine wiring
- 0.017.1246.4/10 – Front cold climate wiring
- 0.017.1741.4/10 – Front cold climate wiring
- 0.017.3382.4 – Heater blowers wiring
Service Info
A0 – TRACTOR
- Diagnostics 2026 subscription
- After-sales 2026 subscription
- SERVICE NEWS RESEARCH GUIDE
- Diagnostics 2025 subscription
- After-sales 2025 subscription
- Diagnostics 2023 subscription
- Diagnostics 2024 subscription
- Diagnostics 2022 subscription
- Diagnostics 2021 subscription
- After-sales 2024 subscription
- After-sales 2023 subscription
- After-sales 2022 subscription
- After-sales 2021 subscription
- After-sales 2019 subscription
- SDF Parts and SDF Service DVV 04/2014, version 26
- Technical Documentation DVD 03/2010
- New function: Download PDF manuals
- Diagnostics – 2020 subscription
- After-sales – 2020 subscription
- After-sales – 2018 subscription
- Service and Spare Parts – 2017 Subscription
- SDF Parts and SDF Service DVDs 05/2014 version 25
- SDF Parts and SDF Service DVDs 03/2013 version 24
B0 – ENGINE
- Flushing the lubrication circuit
- Deutz AG engine oil specifications
- SerDia 2010 updating license file
C0 – ENGINE ACCESSORIES
- Diagnostic protocol – AdBlue – Float level unit
- Filter and prefilter tool p/n 5.9035.865.0
- Additive for diesel fuel
D0 – TRANSMISSION
- Retainer circlip of 4WD drive engagement mechanism
- Cracks in rear gearbox housing
F0 – FRONT AXLE
- Check the front axle steering knuckles for wear
- Steering behavior check procedure
G0 – BODYWORK – CAB
- Air conditioning system recharging
H0 – HYDRAULIC AND PNEUMATIC SYSTEM|
- Hydraulic CUNA trailer braking kit (ITALY)
- Single connection hydraulic braking kit availability update – only for EUROPEAN market
- Resonator failure
- Assembly instructions for solenoid valves and cartridge valves
- L0 – ELECTRIC AL SYSTEM